

Undertaking a view analysis can be a powerful design tool. Sometimes we want to maximise visibility, say from a balcony to a point of interest, while other times we want to minimise the visual impact, say to adjacent or heritage-listed buildings. Below are a few options available to Grasshopper users to undertake a view analysis:
Simple 2D – Isovist
One of the simplest methodologies for conducting a view analysis is to use an isovist. An isovist is the volume of space visible from a given point in space. Isovists are naturally three-dimensional, but they may also be studied in two-dimensions. Grasshopper has a native isovist component which generates 2-dimensional isovists. Ladybug also has a ‘view rose’; however, I have found this to be less robust. This methodology is best utilised for simple scenarios where 2D resolution is sufficient. For example:
- Urban planning;
- Shopfront visibility in a retail mall;
- Patient visibility from a hospital’s nurse station;
- Etc.
In this scenario, the ‘fitness’ of the solution can be considered the area of the isovist. The larger the area, the greater the visibility.

Simple 3D – Isovist
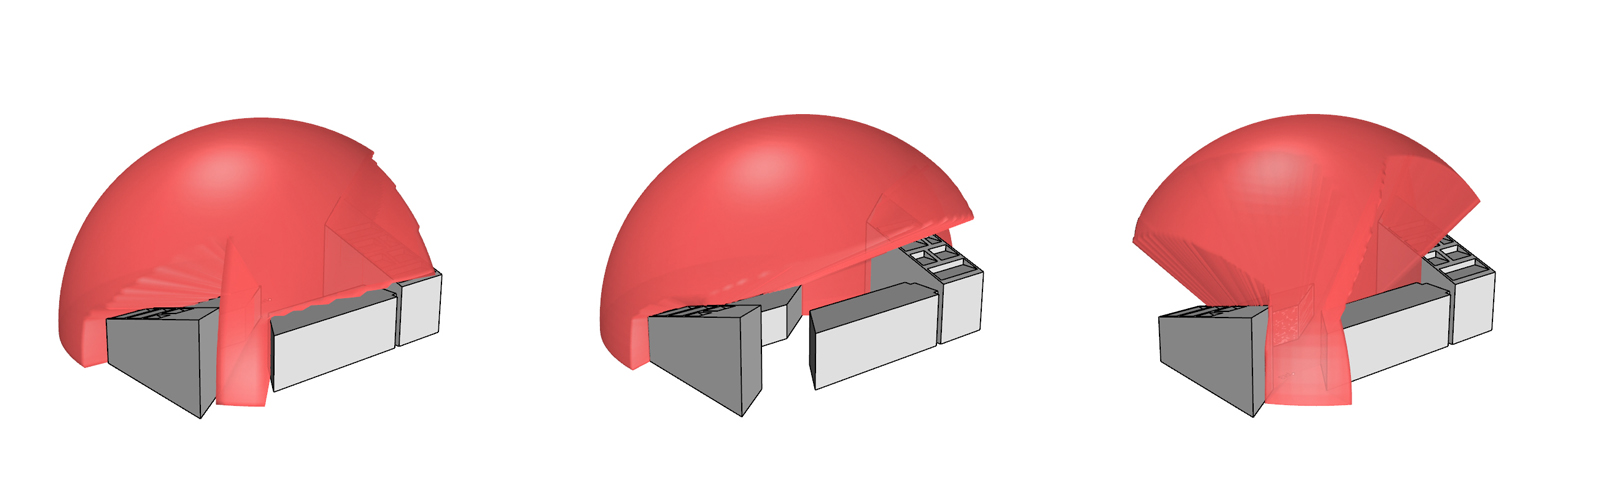
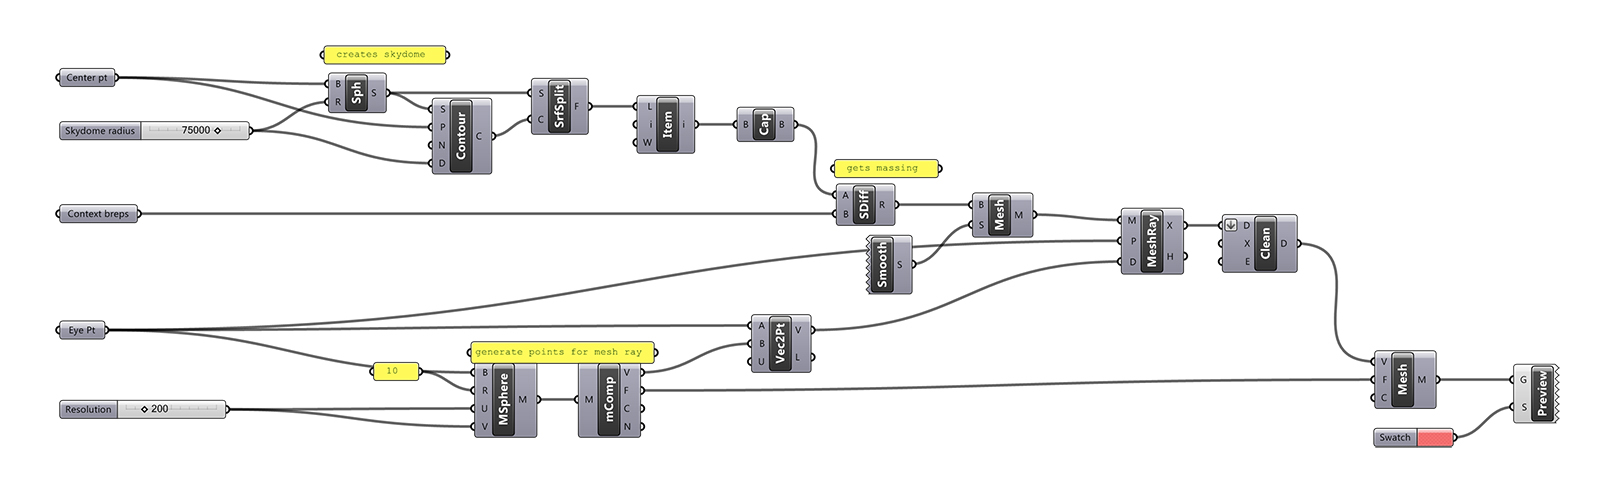
To get a more spatial understanding of a view, we can use a 3D isovist. The script below is based on Andrew Heumann’s script. Mainly want we want to do is to create a semi-sphere which will be our ‘skydome’. We then need to subtract any objects which will block the views, that is, the context. It is then just a matter of a simple mesh ray to generate the isovist. In this scenario, the ‘fitness’ of the solution can be considered the volume of the isovist. The larger the volume, the greater the visibility.
Advanced – Ladybug view analysis
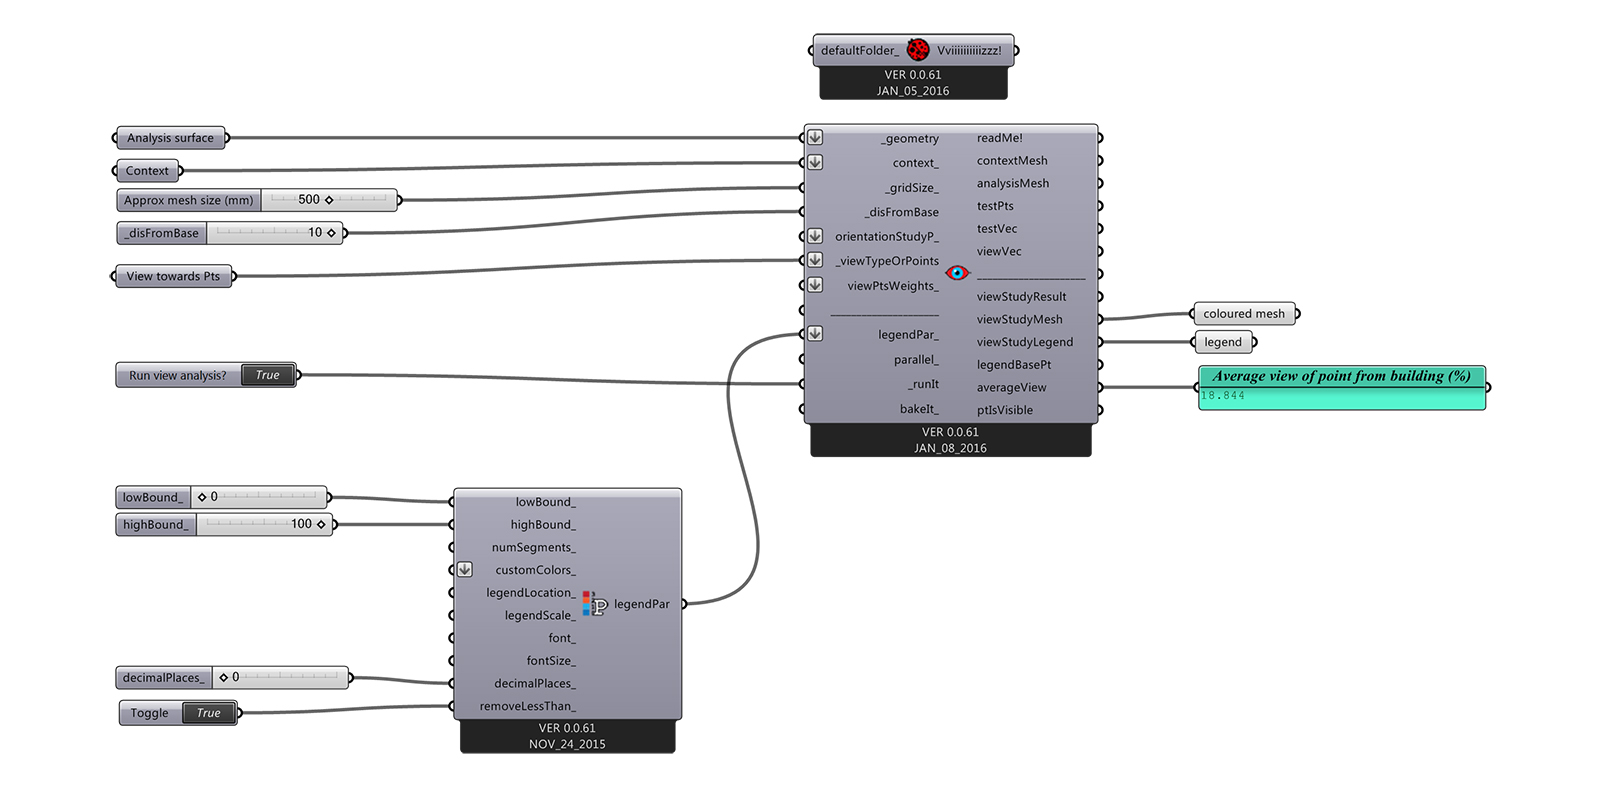
If you want to evaluate views from a surface, say from a façade, Ladybug’s ‘View Analysis’ component is ideal. The component will allow you to run the analysis using either view type or points.
View types
A view type is an integer representing the type of pre-generated view analysis that you would like to conduct:
- 0 = Horizontal Radial. The percentage of the 360 horizontal view band visible from each test point. Use this to study horizontal views from interior spaces to the outdoors.
- 1 = Horizontal 60 degree cone of vision. The percentage of the 360 horizontal view band bounded on top and bottom by a 30 degree offset from the horizontal (derived from the human cone of vision). Use this to study views from interior spaces to the outdoors. Note that this will discount the ‘_geometry’ from the calculation and only look at ‘_context’ that blocks the scene.
- 2 = Spherical. The percentage of the sphere surrounding each of the test points that are not blocked by context geometry. Note that this will discount the ‘_geometry’ from the calculation and only look at ‘_context’ that blocks the scene.
- 3 = Skyview. The percentage of the sky that is visible from the ‘input _geometry’.
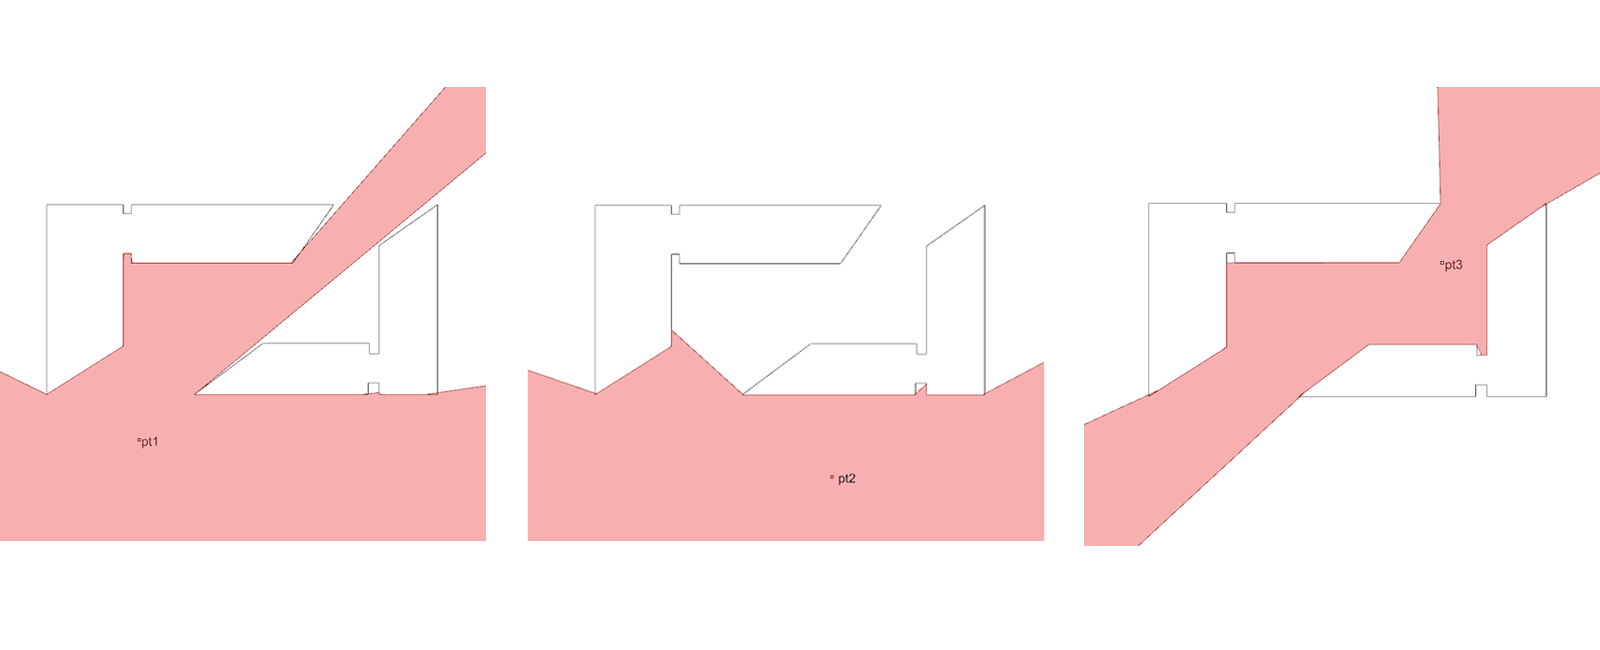
View points
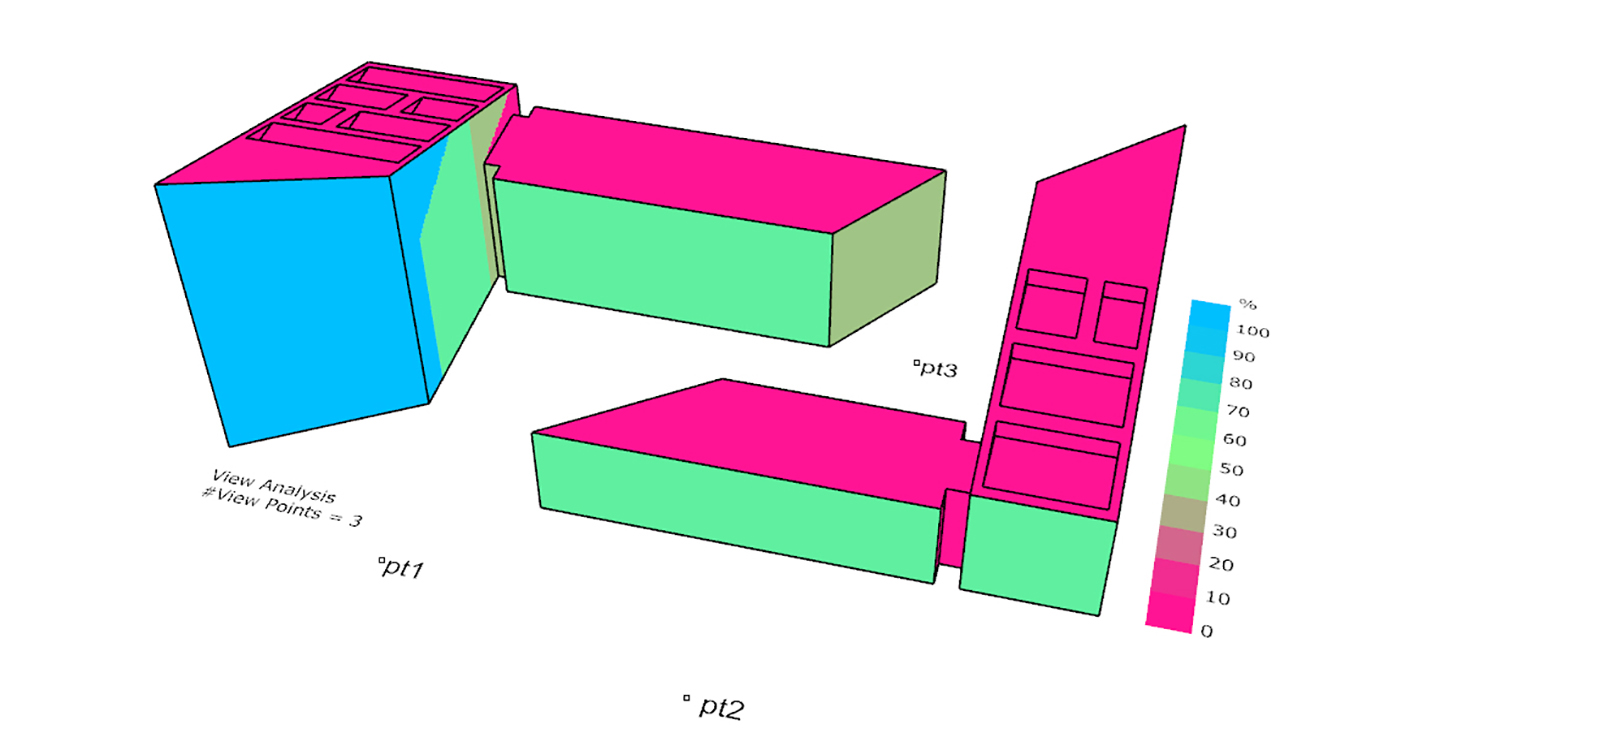
Alternatively, you may have specific points that you want to test the visibility. These points may be points of interest, such as an iconic building, park or sea views. The example below is using 3 points of equal weighting. If the points require different weighting, that is, if some views are more important than others, then enter in relative value into the optional ‘viewPtsWeight’ input. Ladybug will produce a colour-coded mesh based on the number of points visible from each test point.
A legend parameter node must be connected with a low and high bound input to allow for an accurate comparison between options. This setting will ensure that the legend will remain consistent from option to option. Without enabling this, Ladybug will automatically adjust the min/max bounds, which will make comparing options difficult.


27 Comments
Federico Secci
Hi, I’m a student of engeineering and architecture from Perugia, Italy. First of all I apologize for my poor english. I’m a beginner user of grasshopper and I’m trying to make a visiblity analysis for my thesis. To get into the details I wanted to replicate the analysis I saw in this video
(Dynamic Viewshed) . Do you think is possible? And which option, instrument or plugin I can use in your opinion?
paulwintour
Hi Federico. If you just want to animate it, I suggest you draw a path (spline) and the use the point on curve component to define the current point. Then simply animate the slider. You can then combine this with the methodologies above.
If you want exactly as in the video which looks as though it has a view cone (90 deg horizontal, 45 deg vertical), then it is just a matter of modifying the 3d isovist script to be a cone, rather than a hemi-sphere.
Federico Secci
Hi Paul, I have tried to replicate the definition “Simple 3D Isovist” but I can’t obtain the same result you got. In particular, at the end of the process, I obtain a planar mesh on the XY plane and not a trimmed sphere. Where can I download the definition you showed in the article?
paulwintour
Hi Fedrico. I’ve uploaded the files. You can find the link to a *zip file with all three examples at the end of the post. Let me know if you are still having problems.
Federico Secci
Hi Paul, thank you so much for the files. I’m still having some troubles. Eye pt and Center pt are the same point? I set eye pt and center pt as the same point and then I set the context breps but I still obtain a planar mesh. Another question, if the semi-sphere is bigger than the area containing all the context breps it will still be cutted?
Federico Secci
https://we.tl/NPsDKKyIpQ
Here is what I get.
paulwintour
Hi Frederico. The eye point is the same as the centre point (although you may want to move it up 1600mm to be more accurate). Are you working in mm or meters? You may need to modify the resolution/radius/etc of the mesh sphere. Yes as you can see from the image, if the semi-sphere is bigger it will still be subtracted.
tompouce4
Hi Paul. Amazing work on these definitions. I was wondering, do you think it is possible to isolate only the rays that stay semi-infinite? Thus visualizing only the extent of sky seen at one given point?
paulwintour
Hi. Thanks for your feedback. Which analysis method are you referring to? For the isovist analysis, you would just need to filter out the rays based on a conditional statement so that you only returned the ones that matched the same radius parameter (that is, infinite rays). If you just want so see which parts of the sky you can see than there is a Ladybug component that does that called ‘Ladybug_Shading mask’. But that is a different tutorial all together.
Minwoo Kang
Hi Paul. It’s a truly amazing way of analysis. I really need a simple 3d isovist analysis(sky dome isovist) method for my research. If you don’t mind, can I get that definition by email? Download homepage is not accessible now…
reut
Hi everyone!
My name is Reut, and i’m an architecture student.
Hoping to get some help from you about the view analysis in grasshopper.
can you send me some tutorials that explain how it’s work? special in 3d.
also if you have some files about it and how to create the animation film like the one that Released at the beginning. this way of analysis is amazing! and it’ll be Very helpful to my project.
Thanks!
paulwintour
I’m not really sure how to respond to this comment. This IS the tutorial, what more do you want? I don’t give out files any more – too many students just being lazy and just wanting to copy rather than learn. You have all the information to recreate it. It you get stuck, post your questions and files and I’ll try and help.
reut
Hi Paul.
I didn’t mean that I want the code, just if you have some more info about this plug (because I’m having some problems to find tutorials of it). if you have some video tutorial it’ll be great, because I’m new in grasshopper and don’t know how everything work.
I’ll try to start working with this example and if I get problems I’ll ask you and others here.
thanks.
gizemmersinn
Hi,
I am Gizem from Turkey, i have graduated from architecture on last summer and now i am a certificate program students of an architecture and urbanism research academy and i am working on Beşiktaş Square which is a one of the most used square in Istanbul and i am doing digital analysis on this place. One of parameter of this project is space syntax also isovist and view rose, i am trying to do your script but i can’t do it because of some tiny problems such as i have not command like”clean” for 3d isovist and ladybug view analysis doesn’t run may be i can not really understand some inputs such as analysis surface, legend, i would be so glad if you can help me. thanks
paulwintour
Can you post your file and/or an image of the script. Otherwise it’s impossible to understand the issue.
HC
Thanks for posting this tutorial, Paul!! It is very helpful.
However, I got some questions relating the Ladybug view analysis:
1. If I am not going to input a viewpoint for the analysis and just input “2- spherical”, what will be the viewpoint located for the view analysis?
2. It seems that the geometry could not be a surface. I am just wondering what if I want to analyze the visibility for buildings on a terrain? Is it possible to do that?
Best regards,
-HC
Paul Wintour
You can input a surface into Ladybug and it will work. Under the hood it is converting this to a mesh and using the centroid of each mesh face as the analysis points. These points are then offset so that they are not self occluding.
If you are getting an error, it sounds like it might be related to your units. I’m using mm in the script. That’s why grid size is 500mm and offset is 10mm. If you are using meters and you’ve copied those values, the results will be very different.
HC
Hi Paul,
Just saw your profile and see you have been teaching in HKU. Although I am a student from HKUST, I still want to thank you again for the tutorial.
-HC
OmerD
Thanks for the tutorial.
I tried to do Simple 3D Isovist following your code.
But I couldn’t find the components as “clean” and “Item”.
What are their full names?
Paul Wintour
Hi Omer
Clean = Clean Tree. And the input you need is ‘t’. (That file is a bit old and some components were rrenamed in the newer versions of Grasshopper. )
Item = List item
I hope that helps
ayushyauppal
Hi Paul,
Thank you for the tutorial!
I was running into some trouble as the MeshRay Intersection was not selecting all the points. Specially the points directly above it. And also, it is not creating an external mesh for the intersecting planes but directly connecting the individual planes to the view point.
https://we.tl/t-SEnP0Ermj7
Thanks
Ayu
Shruti
hello Paul, the post has been very useful, I am new to grasshopper and have been trying to find how to run the analysis using isiovist. It will be very helpful if you can share the above mentioned scripts to study the module that i have made for the academic purpose
Paul Wintour
Hi. I no longer provide scripts to download as students tended to just download and use them without learning how to create them. The images are there so that you can re-create them.
shruti
hello Paul, your script has been very helpful
can you please hlp with which one is mcomp parameter?
Paul Wintour
Mcomp was ‘Mesh component’ but it has since been renamed to ‘Decompose Mesh’.
Yerrti
Hi Paul, thanks for your tutorial! Can you please tell me what the input ‘Smooth’ is? I do not actually understand that component and cant find it
Paul Wintour
Hi Yerrti. The component is called ‘Settings (Quality) (Smooth)’ and it’s under the Mesh > Utility tab.