

When documenting a project, it is often desirable to have viewports aligned between sheets for a consistent graphic layout and to improve legibility. Within Revit, this can be achieved manually by using a Guide Grid (View > Sheet Composition > Guide Grid). Once created, the guide grid must be applied to each sheet via the Properties Pallet. Then, via snaps, viewports can be moved to align from sheet to sheet. However, this process is time-consuming and may need to be repeated multiple times throughout a project, for example, if the view’s extent changes.

Aligning viewports on sheets with Dynamo
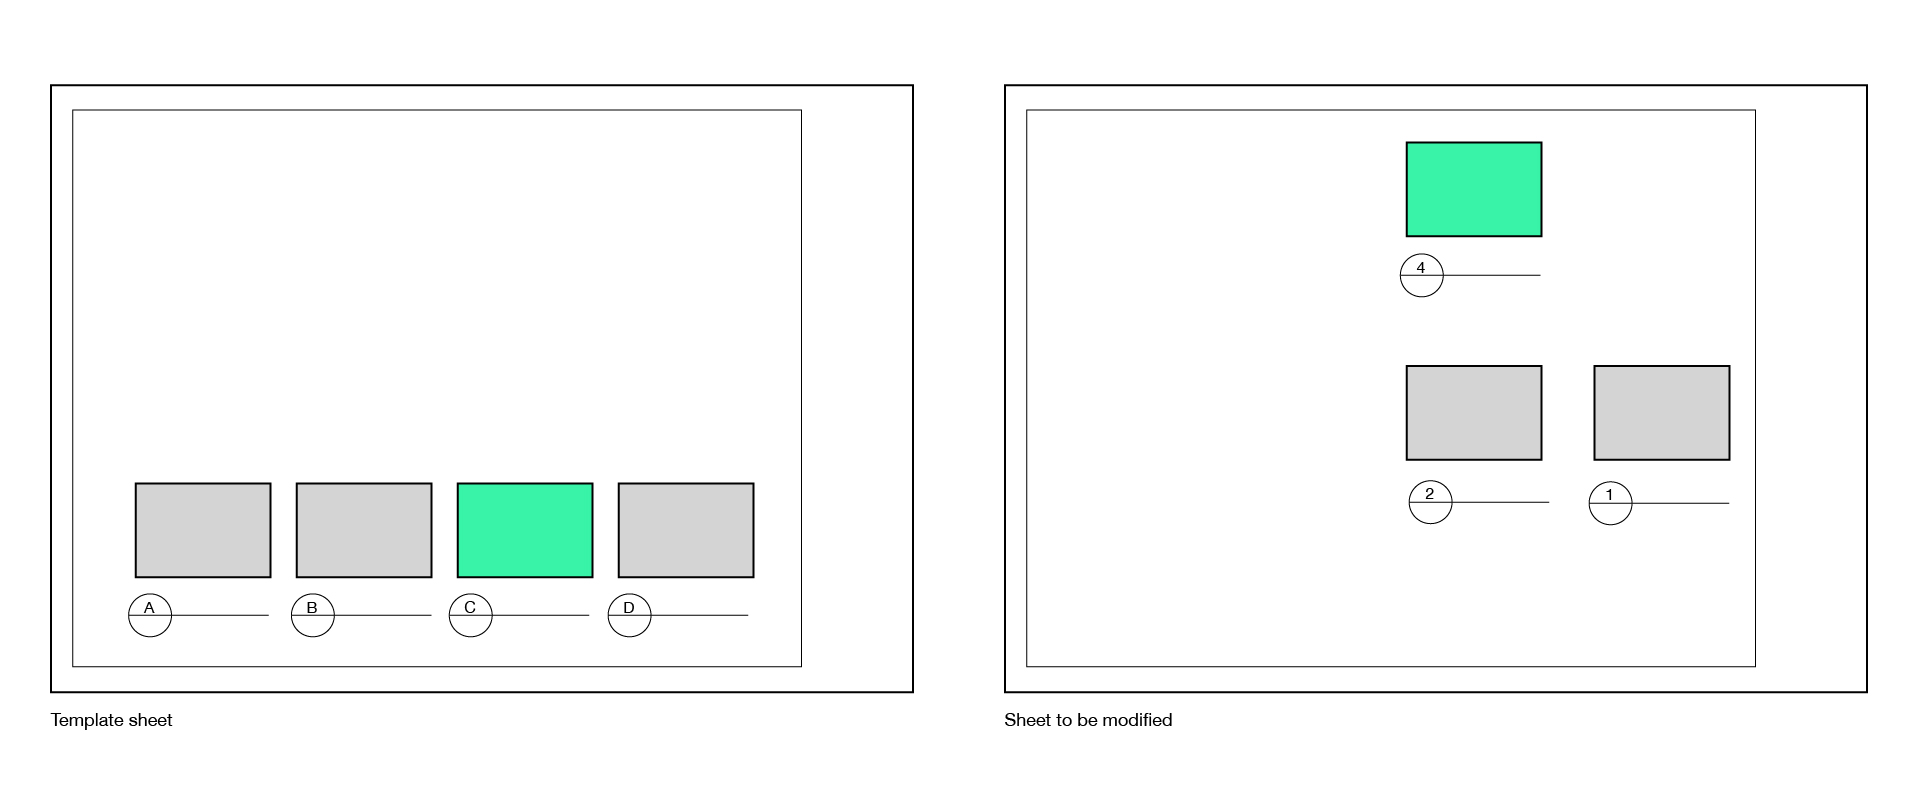
To solve this problem, Parametric Monkey has developed a custom Dynamo graph as part of our Dynamo Package Development service. The graph uses a user-defined ‘template’ sheet to determine the viewport location, viewport type, label position and label line length. These values are then pushed to the sheets to be modified. Before running the graph, ensure the views have already been placed on the sheets.
To run the graph:
- Select the sheets to be modified in the Project Browser.
- Define the ‘template’ sheet number to reference (#1).
- Define the viewport sorting method (#2). Viewports may be sorted by detail number or by viewport order.
- Define the viewport alignment method for plans (#3) and for sections/elevations (#4). Viewports may be aligned via centre point or by datum (where possible).
- Define the label alignment method (#5). Labels may be aligned by offset (relative to the bottom left corner of the viewport) or by position on the sheet.
- Press Run.
Computational logic
The graph collects the viewports from the template sheet (input #1) and the sheets to be modified (selected in the Project Browser). If the user forgets to select sheets in the Project Browser, the graph will be aborted, and an error will be returned. Next, the location of the title block family instance is updated in the sheets to be modified to ensure that once viewports are aligned, the sheet layout will be consistent. Once complete, the viewport’s Detail Number is returned, and depending on the viewport sorting method specified (input #2), the viewports are paired for alignment.

Viewport sorting method
If ‘by detail number‘ has been defined (input #2), the graph will, for example, match viewport 3 in the sheets to be modified with viewport 3 in the template sheet, irrespective of their view types. The detail number can be any value, but they must match in order to be paired. Note, however, that the pairing is not case-sensitive, so viewport ‘a’ will be paired with viewport ‘A’. This method is best when the viewport sequence is important, such as on room data sheets.

If ‘by viewport order‘ has been defined (input #2), the viewports are sorted (numerically and then alphanumerically)based on their Detail Number and then paired in order, irrespective of the actual Detail Number value. For example, if the template sheet has viewports A, B, C and D, and the sheet to be modified has viewports 1, 2 and 4, viewport 4 (to be modified) will be paired with viewport C (template). This method is best for scenarios where the viewport sequence is unimportant, such as on typical detail sheets or sheets with only one viewport.
Viewport alignment method
Once paired, the viewports on the sheet to be modified are adjusted to match the template sheet. This can be done via centre point or by datum (input #3 and #4).
Via centre point
If ‘via centre point‘ is specified, the viewport to be modified will inherit the template viewport’s position. This simple method works well when the paired view’s extents are identical. However, if the view’s extents don’t match, the elements visible in the views will not align.

By datum
Alternatively, if ‘by datum‘ has been specified (input #3 and #4), the graph will attempt to align views irrespective of their view extent. This adjustment only works on plan views (floor plans, ceiling plans and area plans) and elevations/sections. The centre point alignment is used for all other view types, including 3D views. The graph will also revert to centre point alignment if no alignment can be found or the view types do not match.
Align plans by datum
For plan views to align ‘by datum‘ (input #3), both the template view and view to be sorted must be a plan. If so, the graph searches for the visible grid intersections in the views and uses this as the basis of alignment. For example, if grid intersection A1 is visible in both views, this point will be used for the X-axis and Y-axis alignment. The graph will revert to centre point alignment if no match can be found. Aligning plans by datum works best for General Arrangement (GA) plans, where positional consistency is important. However, for room data sheets, it is better to align plans via centre point to ensure sheet layout consistency, as otherwise adjacent rooms, where grid intersections are visible, will appear ’tiled’.

Align sections/elevations by datum
For section and elevation views to align ‘by datum’ (input #4), both the template view and view to be sorted must be a section or elevation. If so, the graph extracts the lowest level visible in the view and uses this as a reference for alignment, irrespective of whether the levels are the same. For example, suppose the template sheet has an internal elevation with Level 1 visible, and the sheet to be modified has an internal elevation with Level 2 visible. In that case, these datums will paired, and Level 1 in the template viewport will be used for the viewport’s Y-axis alignment. The viewport’s X-axis alignment is inherited from the template’s centre point. Aligning sections and elevations by datum works best for most situations, except for typical details, where via centre point should be used.

Label alignment method
The final step is to define the viewport label’s alignment (input #5). As per the Revit API, the viewport’s label offset is relative to the bottom left corner of the viewport outline. In other words, the label’s location is relative to the viewport and is not an absolute XY coordinate on the sheet. Therefore, if ‘aligned by offset‘ is specified (input #5), the viewport’s position will be consistent relative to the viewport’s extent. However, if the extents of the viewports don’t align, the labels will not align.

Alternatively, if ‘by position on the sheet‘ is specified (input #5), the graph adjusts the offset value to ensure the labels align in absolute coordinates between sheets.

For all viewports in the sheets to be modified, the viewport type and label line length are updated to match the template viewports.
Conclusion
Our aligned views on sheet workflow is a powerful tool for ensuring graphic consistency across sheets. To find out more about our Dynamo Package Development service, drop us a line and discover how we can automate your Revit workflows.


