
In our previous tutorial, ‘Create marketing plans‘, we demonstrated how to create individual floor plans for each apartment automatically. This tutorial, which forms part 2 of our marketing plan workflow, illustrates how to automatically place those marketing plan views onto individual sheets and set the various title block properties.
The workflow
Once all floor plans have been created with the ‘Create marketing plans‘ graph, we can create the associated sheets. The process involves the following steps:
- Create sheets and place views on the sheet
- Set scale bar in title block
- Set north point rotation in title block
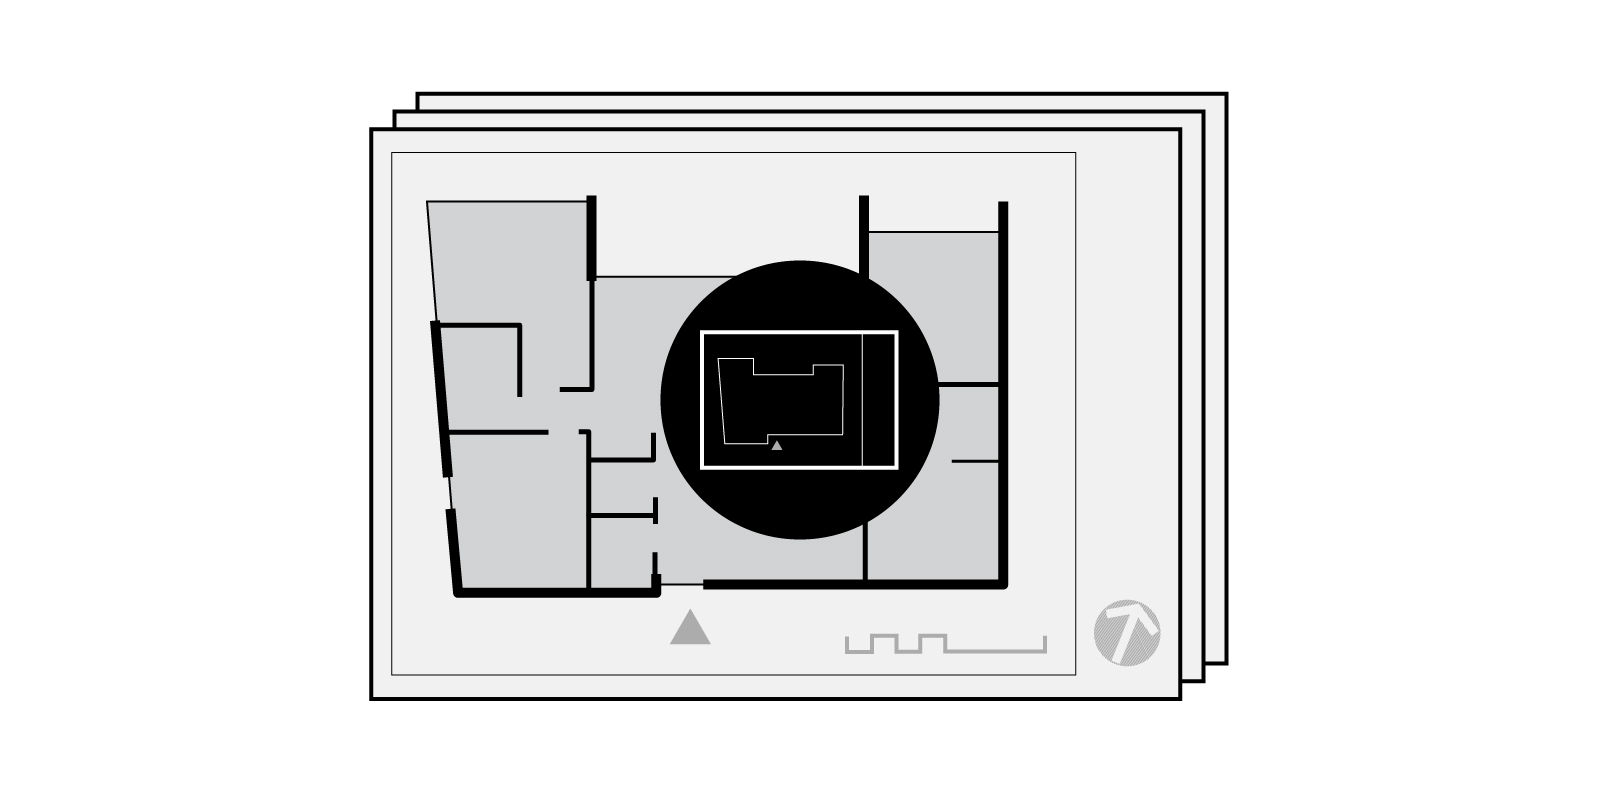
- Place key plan family on sheets (Optional)
- Set key plan visibility
- Set sheet properties (Optional)
This process is then repeated for every apartment!
The problem
In addition to the sheer amount of time required to undertake the process, two steps can be challenging if undertaken manually. The first is Step 3, which relates to setting the north point. Most organisations will have embedded into their title block an instance parameter that controls the north point’s rotation. However, as we saw in the previous tutorial, views are often rotated so that the entry door is at the bottom of the sheet. This orientation is apparently more legible to potential buyers. This requirement means that the task isn’t as simple as setting a global north point rotation. For each view, we need to calculate it’s rotation (and direction) from True North. Depending on your design, this could be challenging, usually involving many temporary construction lines and dimensions.
The second challenge is Step 5, which relates to indicating the correct apartment in the key plan. With views being rotated independently from each other and apartments looking very similar, it can be easy to indicate the wrong apartment on the key plan. This error can become problematic if not picked up before the sales contract is made.
Placing marketing plans on sheets with Dynamo
Parametric Monkey has developed a Dynamo Player graph, available as part of our Dynamo Package Development service, to help solve this problem. For flexibility, the graph is broken down into six parts, one for each step.
Step 1: Create sheets and place views on the sheet
- Before running the graph, ensure that all marketing plans have been created.
- In the Project Browser, select the views to be placed on sheets.
- Define the ‘Title block Family Type’ to be used for the new sheets.
- Define the ‘Sheet Number Prefix’. For example, “SP” for sales plans. Note, this workflow uses a shared parameter of category ‘Sheet’ and ‘Rooms’.
- Define the ‘Sheet Number Suffix parameter’. Typically this will be the parameter name denoting the apartment number. Again, this workflow uses a shared parameter of category ‘Sheet’ and ‘Rooms’.
- Define the ‘Sheet Name parameter’. This value will be used for the Sheet Name. It may be a shared parameter or the standard OOTB Sheet Name parameter.
- Define the ‘Sheet – Project Browser folder’. This value will be used to group the sheets in the Project Browser (if applicable).
- Define the ‘View Prefix’. This value will be removed from the View Name and used for the Sheet Name.
- Press Play to run the graph.

Computational logic
The graph collects all the selected Project Browser views and filters out those already placed on a sheet. If no views are selected, an error is returned. Views excluded because they are already on a sheet are returned separately. The crop region visibility parameter of each view is then set to off (not visible).
For each view, the Sheet Number Suffix is obtained by removing the prefix from the view’s name (e.g. “SP_”). Sheets are then created and numbered “Sheet Number Prefix_Sheet Number Suffix”. Sheets that already exist with a matching Sheet Number are excluded and returned separately.
If either parameter name is not recognised, for example, due to a spelling error, an error will be returned.
If no family of type ‘Title block’ is selected for the title block, an error will be returned.
Step 2: Set scale bar in title block
- Select the sheets to be modified in the Project Browser.
- Define the ‘Scale bar parameter name contains’ to identify the scale bar visibility parameter, e.g. “Scale”. This value will be used to collect all parameters containing that value, e.g. “1-50 Scale” and “1-100 Scale”.
- Press Play to run the graph.

Computational logic
The graph collects all sheets selected in the Project Browser and obtains their title block. If no sheets are selected, an error will be returned. The names of the parameters within the title block family are then compared to match any containing the identifier (e.g. “Scale”). The view’s Scale value is then calculated and matched with the scale bar parameters. If a match is found, the scale bar visibility parameter is enabled (visible). The remaining scale bar parameters are disabled (not visible).
Step 3: Set north point rotation in title block
- Select the sheets to be modified in the Project Browser.
- Define the ‘Title block parameter – North arrow rotation’. This value should be an instance parameter of type ‘Angle’.
- Press Play to run the graph.

Computational logic
The graph collects all the sheets selected in the Project Browser. If no sheets are selected, an error will be returned. The viewports on the sheets are then obtained. If more than one viewport exists on the sheet, an error is returned.
Next, the angle between Project North and True North is calculated. This value is required as north points generally reference True North (and not Grid North as explained here). Therefore, if views are orientated to Project North, we need to factor this in when calculating the rotational value.
For each view, the graph calculates its ‘UpDirection‘, that is, its rotation. If the view is orientated, as per the Properties Pallet, to Project North, the rotational value is adjusted to obtain the angle to True North. If the view is orientated to True North, only the view rotation is required.
Note that this calculation only affects the north point family and its rotation parameter, not the actual floor plan, as this is already orientated correctly. Moreover, this method assumes that the north point relates only to the floor plan view. It does not take into consideration the orientation of the key plan (step 4).
Step 4: Place key plan family on sheets (Optional)
This step is optional as sometimes the key plan is nested into the project title block. Note that if you have multiple key plans, you’ll need to run this step multiple times, one for each key plan.
- Select the sheets to be modified in the Project Browser.
- Define the ‘Key plan – Family Type’. This value is the Generic Annotation family to be placed on the sheet.
- Define the ‘Key plan – X coordinate’ and the ‘Key plan – Y coordinate’.
- Press Play to run the graph.

Computational logic
For each sheet selected in the Project Browser, a key plan family is placed relative to the title block’s insertion point. Note that the key plan isn’t rotated. This limitation means that the north point (step 3) will only match the floor plan view and not the key plan. If the key plan is required to be rotated to match the north point, this can be easily customised.
Step 5: Set key plan visibility
- Select the sheets to be modified in the Project Browser.
- Define the ‘Sheet number prefix’. This value is used to calculate the corresponding apartment number.
- Define the ‘Key plan family name filter’. This value is used to identify the key plan families.
- Define the ‘Key plan parameter prefix’ (Optional). This value is useful if the key plan parameters are named slightly different from their corresponding apartment number.
- Set the ‘Replace level prefix’ toggle (Optional). This input is required if a single key plan has been used for multiple levels/apartments.
- Define the ‘Apartment number digit length’ (Optional). This input is required if a single key plan has been used for multiple levels/apartments.
- Press Play to run the graph.

Computational logic
The graph collects all the sheets selected in the Project Browser. If no sheets are selected, an error will be returned.
The corresponding sheet numbers are then collected, and the sheet number prefix removed. Due to the naming convention adopted in earlier steps, this will return the apartment number. However, if a different parameter has been used to identify the apartment number, this can also be used.
Next, the graph collects all Generic Annotations in the project and filters them using string contains. These families are further filtered to obtain only the key plans on the selected sheets.
The key plans’ parameters are then obtained and filtered to include only yes/no parameter types (as these represent visibility parameters). The graph then looks for a match in the parameter names using the apartment number. As such, the key plan parameters’ names must match or be substantially similar to the apartment numbers in the main Revit model. However, if a prefix has been used in the parameter names, it can be specified in Dynamo Player to find the correct match.

Once a match is found, its visibility parameter is enabled (show filled regions), and the remaining yes/no parameters disabled (hide filled regions).
If a single key plan family has been used for multiple levels/apartments, this workflow can also be accommodated. For example, if levels 1 to 10 of the building repeat, there may be a single key plan with a ‘101’ visibility parameter. Apartment 201, 301, 401, etc., therefore, should all reference the ‘101’ parameter.
To accommodate this workflow, set the ‘Replace level prefix’ toggle to ‘True’. Next, define the ‘Apartment number digit length’. In our scenario, this would be two. ‘101’ would, therefore, become ’01’. Similarly, apartment ‘201’ would become ’01’, allowing for a match.
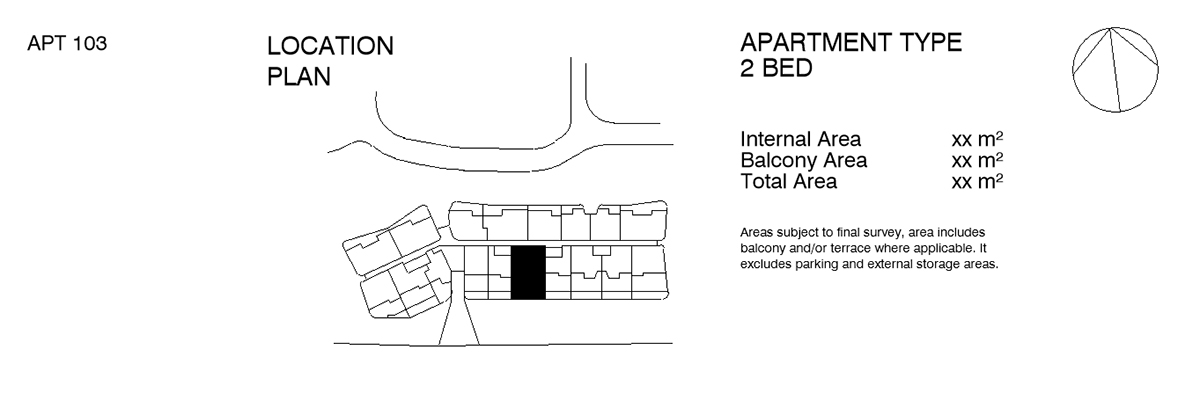
Step 6: Set sheet properties (Optional)
This step is optional as certain critical values such as internal and external areas are sometimes preferred in the title block instead of a room tag. The process involves reading values from the apartment’s room and pushing them into their corresponding sheet. As such, shared parameters need to be established with both the ‘Rooms’ and ‘Sheets’ categories enabled.

The title block family can then be customised to read those shared parameters.
To run the graph:
- Select the sheets to be modified in the Project Browser.
- Define the ‘View Prefix’. This value will be removed from the View Name to obtain the apartment number.
- Define the ‘Apartment number parameter’. This value is used to identify the apartment room in the viewport.
- Define the ‘Apartment/Sheet Parameter – Area total’. This is a shared parameter representing the total area of the apartment.
- Define the ‘Apartment/Sheet Parameter – Area 1’. This is a shared parameter representing the internal area of the apartment.
- Define the ‘Apartment/Sheet Parameter – Area 2’. This is a shared parameter representing the external area of the apartment.
- Define the ‘Apartment/Sheet Parameter – Sheet Name 1’. This is a shared parameter representing the apartment type, e.g. “2 BED”.
- Define the ‘Apartment/Sheet Parameter – Sheet Name 2’. This is a shared parameter representing additional apartment information, e.g. “2 BATH + STUDY”.
- Define the ‘Apartment/Sheet Parameter – Lot’. This is a shared parameter representing the lot, which may or may not be the same as the apartment number, e.g. “103”.
- Define the ‘Sheet – Lot prefix’ (Optional), e.g. “APT”.
- Press Play to run the graph.

Computational logic
The graph collects all the sheets selected in the Project Browser. If no sheets are selected, an error will be returned.
The sheets’ views are then returned, and the view prefix removed from the view name to obtain the apartment number. The corresponding room is then found using the apartment number parameter. This is required as there will often be more than one room visible, such as the balcony. The various room parameter values are then read and pushed to the related sheet parameters.
Note that this process will synchronise the sheet parameter values based on the room parameter values. Since this is not a live connection, such as with Room Tags, the graph will need to be re-run if any values change within the room. Care is required to ensure that any modifications are undertaken on the room elements. If modifications are undertaken directly in the sheet, these changes will be over-ridden once the graph is re-run.
Conclusion
As shown in the above workflow, the placing of marketing plans on sheets can be very involved. While there are often more efficient workflows, such as always showing plans at True North and using Room Tags for areas, developers tend to be very specific about how they want the marketing plans to be displayed. Indeed, the more educated developers will have extensive market research showing which layouts and graphic styles were most successful. As a result, the additional time and effort required for an architect to accommodate these wishes are often seen as irrelevant in the scheme of things, given the potential rewards on increased sales.
However, accommodating these requirements need not be painful. With a clear methodology, Dynamo affords us the possibility to significantly reduce the time and effort required to complete the job.
To find out more about our Dynamo Package Development service, drop us a line and discover how we can automate your Revit workflows.


2 Comments
Carmine
Hi Paul,
thanks for this article. I remember I create a similar workflow time ago, it had just a flow when placing views and legends on the sheets (with coordinates).
What units are the one you control with the node? Is it mm? Which is considered (0,0) coordinate by Dynamo in the Titleblock template? Is it universal or shall I take care of something specific when creating Titleblocks?
Thanks!
Paul Wintour
Hi Carmine.
Since Dynamo 0.8, Dynamo inherits units from Revit. The 0,0 point of the titleblock family is its insertion point (as defined by reference planes). However, once the titleblock is placed, the user can move it. It doesn’t affect printing, but it will affect your Dynamo graph so you need to get its placed position as well.