

After you have done a preliminary SEPP65 solar analysis to test a building’s massing, you can begin to plan out apartment layouts in Revit. Once this is done, and the size and location of every living room and balcony is known, it is necessary to undertake a detailed SEPP65 solar access compliance check. In this instance, the analysis is being used to verify compliance as opposed to informing the design process. Due to the limitations of Dynamo, this tutorial will illustrate how to extract Revit rooms for analysis in Grasshopper and Ladybug before pushing the results back into Revit for scheduling. To see how this can be done in Rhino.Inside Revit, refer to this tutorial.
Step 1: Extract Revit rooms
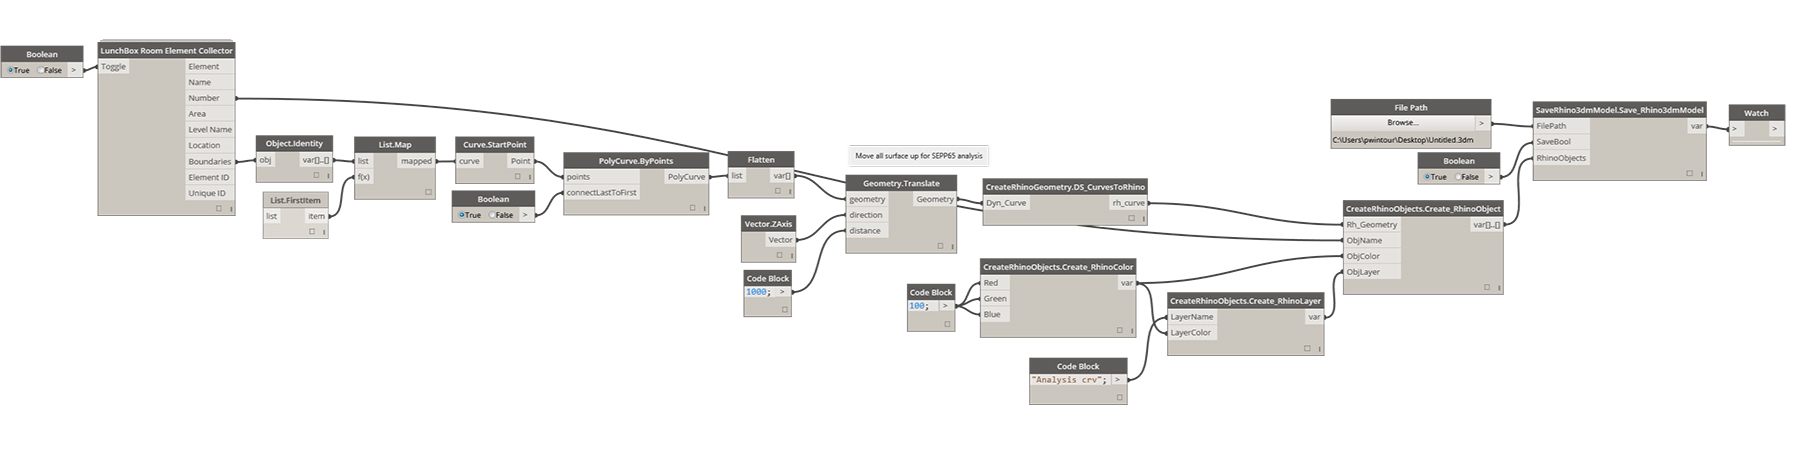
Firstly, ensure that each apartment and balcony is a Revit room. Ideally, these should be numbered logically. For example, the balcony to apartment ‘1.01’ is ‘1.01B’. While this isn’t critical, it will help with scheduling once the analysis is complete. You can use the ‘Room.RenumberByModelCurve‘ node to automate this process. Also, delete any unplaced rooms by going into a schedule and deleting rows as necessary. Next, we’ll use the ‘Room.ExportToRhino‘ node from the BVN Dynamo package. This node requires three inputs:
- File Path – This should be pointing to a blank Rhino file (*3dm). WARNING: WHEN EXPORTING, THE SCRIPT WILL OVER-WRITE THE RHINO FILE. It may, therefore, be prudent to set Dynamo to ‘Manual’ instead of ‘Automatic’ and ensure that you write to a blank document.
- LayerName – This is the name of the layer that will be created in the Rhino file.
- Z translation – This is an optional input. If applied, the room outlines will be moved in the z-direction. The SEPP65 policy requires that solar access analysis occurs at 1m above the finished floor level.

The ‘Room.ExportToRhino’ node uses the LunchBox and Rhynamo plug-ins developed by Nate Miller. Rooms are first collected using LunchBox and their boundaries extracted and converted into closed polycurves. These are then moved up according to the z translation input. In this instance, we are using 1000mm from the finished floor as per the SEPP65 requirements. Rhynamo is then adopted to export the polycurves to Rhino, naming the newly generated Rhino objects the same as the room number it was derived. Ensure the Rhino file is closed before running the Dynamo script.
Step 2: Extract Revit context
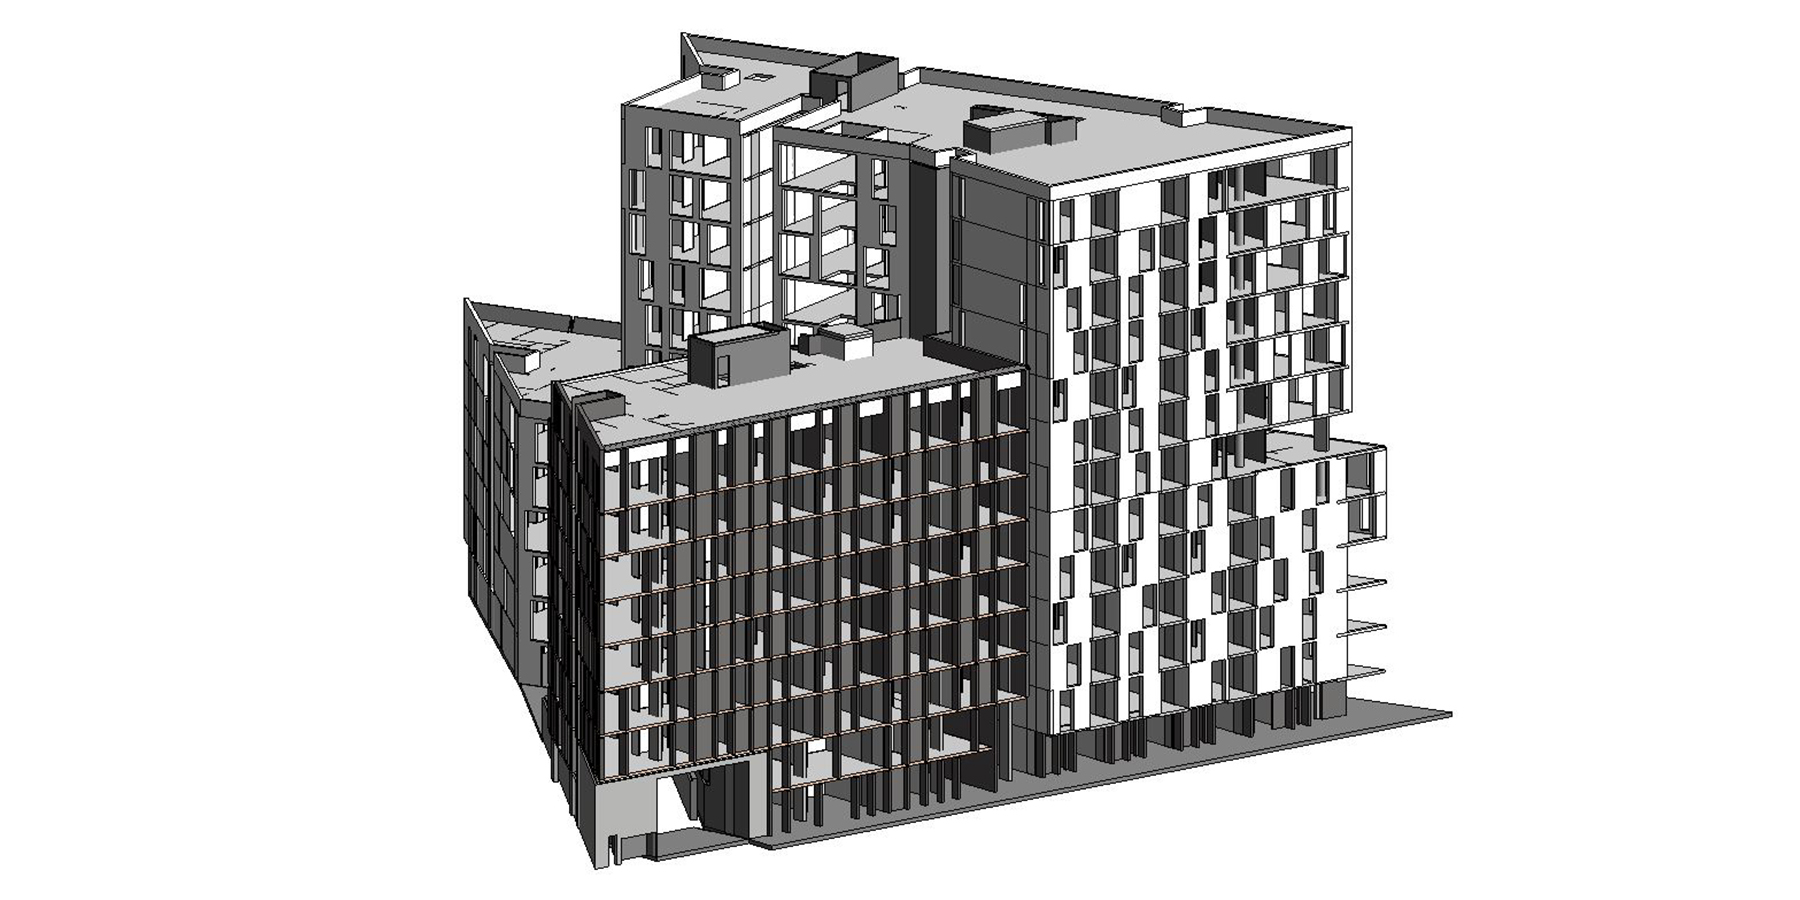
Once the rooms have been exported, it is necessary to export the context for the solar access analysis. The easiest way to do this is to set up a 3D view within Revit. Using Visibility Graphics (VG) in conjunction with worksets and filters, turn off any unnecessary geometry. Essentially all we require are party walls, floors and roofs. Extraneous geometry such as planting, furniture, doors and mullions can all be hidden. Windows are effectively transparent and therefore, can also be excluded from the analysis. The same also applies to glass balustrades. However, since these are often modelled as a wall, you will need to set up a filter to turn off only the glass balustrade wall types and not all walls. It is critical that the context model be as clean and minimal as possible to minimise computational time later in the workflow.
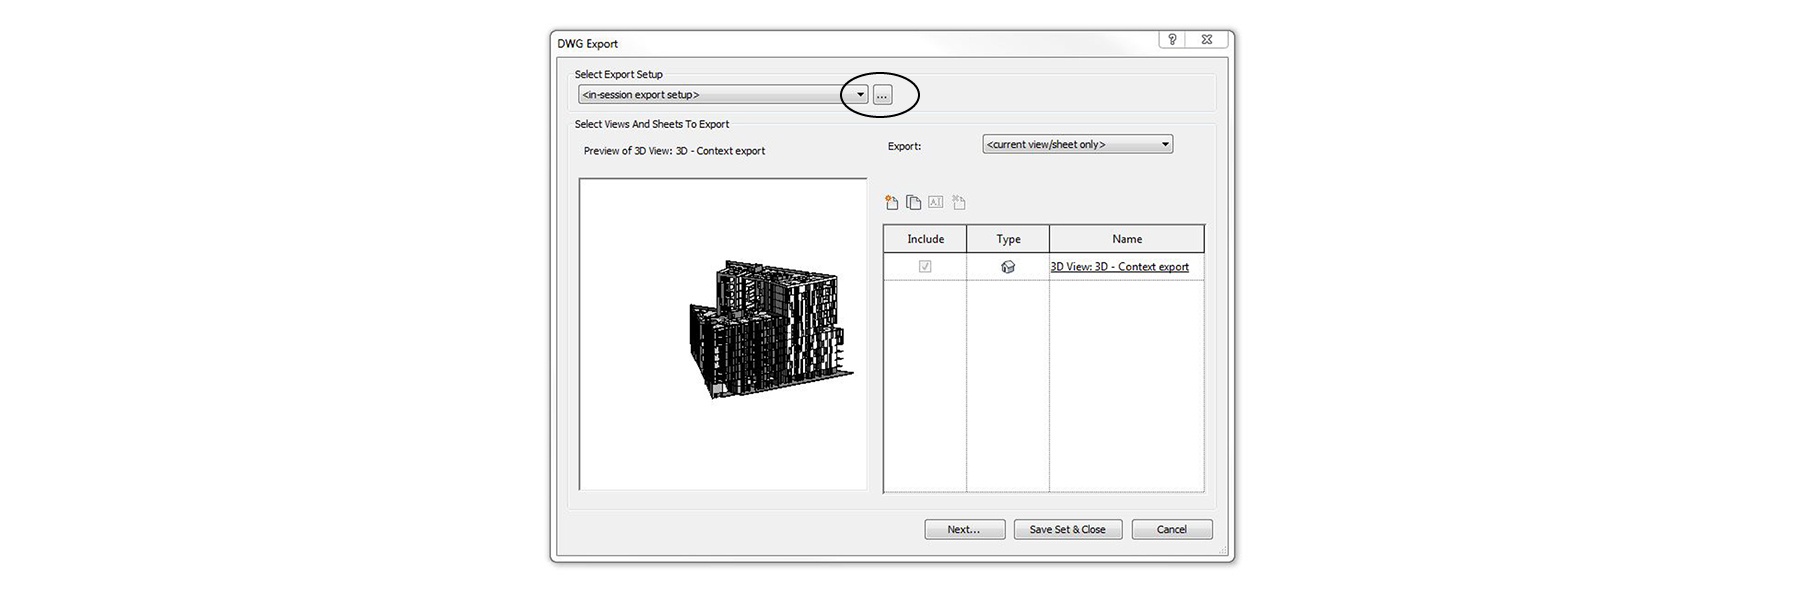
Once you are satisfied with the extent of the context, this can be exported to a *dwg file for import into Rhino:
- In the newly established 3D view, go File > export > CAD formats > *dwg. Hit the ellipsis under setup.
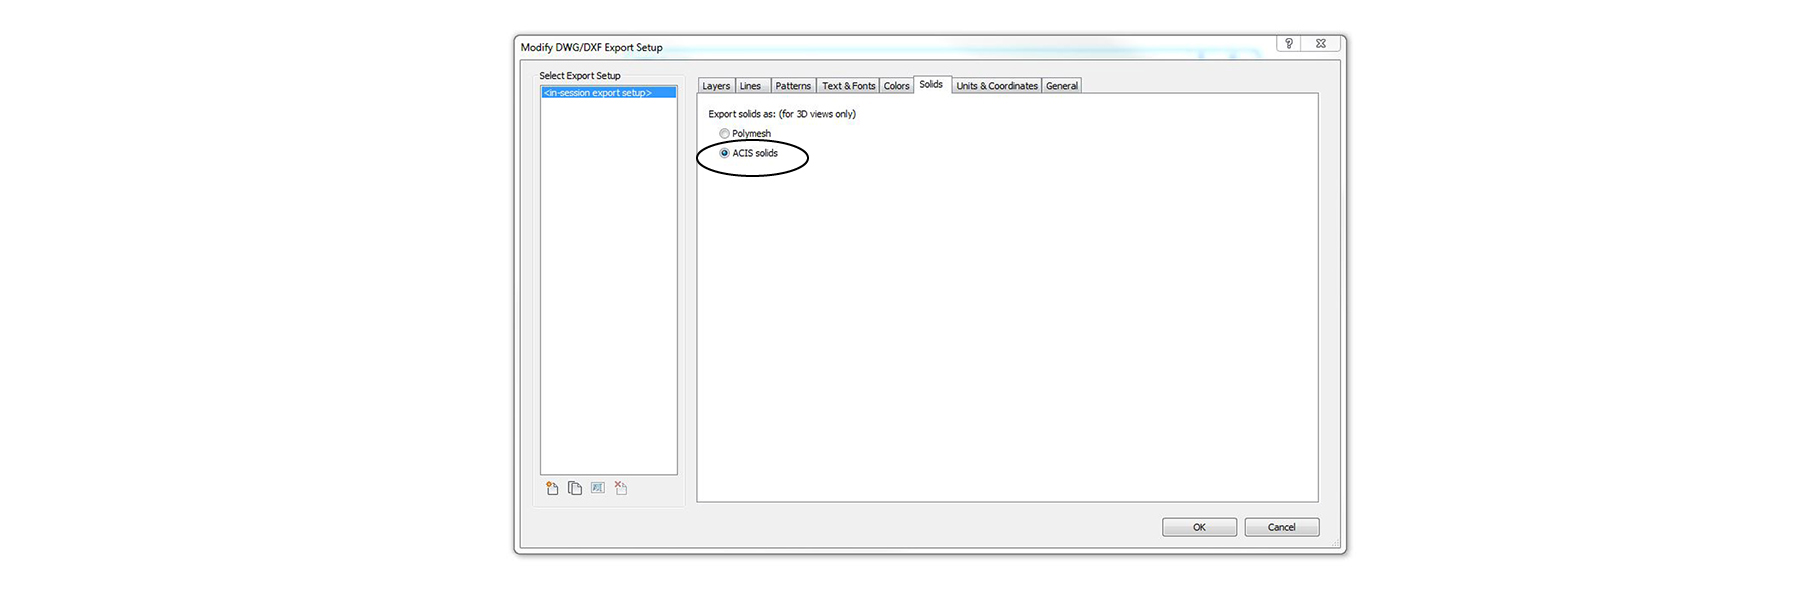
- Under the solids tab, ensure it is set to ‘ACIS solids’. This setting will allow Rhino to import breps as opposed to a mesh and allow any errors or anomalies to be easily cleaned up in Rhino.
Step 3: Rhino import
Import the *dwg file into Rhino. The context should be positioned with the same coordinate system. Explode any blocks and merge all the context onto a single layer.
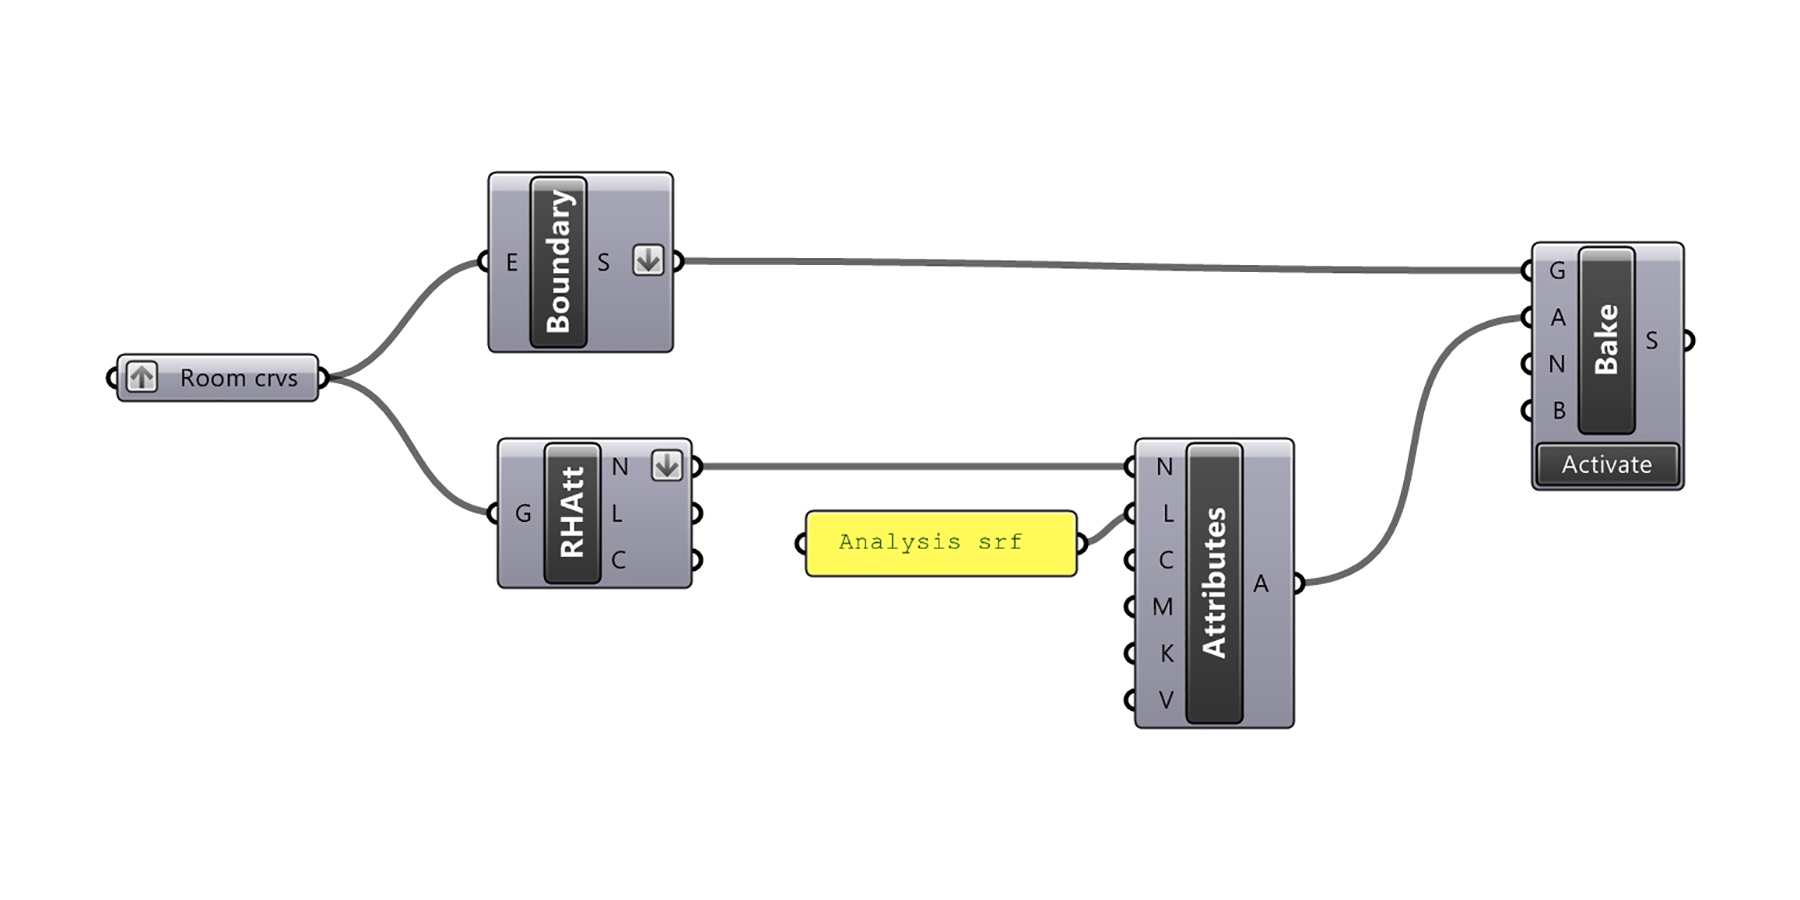
Step 4: Create analysis surfaces
Since the ‘Room.ExportToRhino’ node generated polycurves named according to the room number it originated from, a simple Grasshopper script can be used to convert the polycurves to planar surfaces, maintaining the naming convention.

This generation is easily achieved using Elefront. Note that you will need to graft the curves first as the boundary surface command reorders curves and therefore effects the data tree (refer here for more info). Remember to flatten the lists once the surfaces have been created. From here, we can bake the surfaces and use these as the input for our Ladybug analysis. In theory, this step should be possible in Dynamo. However, there is currently a bug within Rhynamo which means that when exporting the Rhino file, the resultant surfaces follow the bounding box and not the actual room outline.
Step 5: Solar Access Analysis
Now that we have the context and the analysis surfaces, we can run a simple Ladybug sunlight hours analysis to find the complying apartments. The results of this process are visualised via a duotone mesh.

Step 6: Export result to Excel
However, to evaluate if we meet the 70% compliance requirement, we need to be able to schedule the results. This requirement can be achieved by exporting the results to Excel using Lunchbox. Your Excel file should have a single column listing the complying apartment (or balcony) number. Since we used the newer version of ‘Excel Write’ from Lunchbox, headers are included. The headers are removed automatically in the next step in Dynamo.
Step 7: Import results into Revit
To import the results, use the ‘Room.SetSepp65Parameter’ node found in the BVN Dynamo package. The node is referencing a yes/no shared parameter called ‘SEPP65_Solar Access 2 Hrs min‘ which must be set up in your project. The only input required is the file path of the Excel file, which lists all the complying apartments. The Dynamo script will reset all the rooms in the project to ‘False’ before changing only those rooms that comply to ‘True’. You can then use filters in your Revit schedules to highlight apartments compliance.

Step 8: Visualise results
For a visual check, set up a colour scheme which is coloured based on the ‘SEPP65_Solar Access 2 Hrs min’ parameter. This colour scheme can then be applied to dedicated floor plans to illustrate solar access compliance.

To see how this methodology can be modified by replacing Rhynamo with Flux, check out this tutorial.


5 Comments
Florian Coignet
Hi,
First of all, thank you very much for the post it is ver helpfull !!
I am a french ingineer, and I am a beginer in Rhino.
My problem is :
I first tried the BVN node “export rooms to Rhino”. Once I open the Rhino file in which there should be the exctracted rooms and I tape in the command tab “ZE”, a message tells me “no objects visibles”. Nevertheless, my layer has been well created, so I wonder if i is the node that doesn’t work or a missed parameter in Rhino.
As I am working on Revit with French language, I have modiicated the node in consequence, by translating the string “millimeters” to french.
I hope I you will understand what I want explain.
Best regards.
paulwintour
Hi Florian. I am also having issues with it. It seems the room boundaries are not being calculated within custom nodes. Refer: https://forum.dynamobim.com/t/room-boundaries-not-working-in-custom-node/12724
I’ll let you know what I find out.
paulwintour
Hi Florian. I’ve managed to fix it and re-uploaded to the package manager, v1.3.0. Can you try and let me know if you are still having problems. Best to post a picture (put in dropbox, share folder, and paste link here). I would imagine that ‘millimeters’ needs to be in English as it is a Rhynamo input not a Revit or Rhino program input.
Daniel Lister
Hi Paul,
I love your work! Your tutorials are a real inspiration.
Do you think since dynamo has developed a little that is possible to do the analysis without the use of Rhino?
Also at the moment I’m stuck on the grasshopper “Convert Rhino curves to Surfaces”. What is the first component called “Room crvs” and how do you get it?
Many thanks,
Daniel
paulwintour
Hi Daniel. Yes it is possible to do natively in Revit with Dynamo but it will be significantly slower or it my not even work with larger models. Via Grasshopper is still my preferred solution. If you did want to look into it, check out this thread: https://github.com/ladybug-tools/ladybug-dynamo/issues/18#issuecomment-229249604
The component in Grasshopper is just a generic geometry input component which I renamed. Nothing special.