

One of the key requirements of the NSW ‘State Environmental Planning Policy 65 – Design Quality of Residential Flat Development’ (SEPP 65) is the requirement to achieve access to sunlight (Principle 7). The Apartment Design Guide (ADG), which provides design criteria and general guidance about how to achieve this principle, is highly specific and can be difficult to calculate without the proper digital tools.
To address this issue, we have developed a Grasshopper script that utilises the Ladybug plug-in. The script can be used for both a preliminary and detailed compliance check. However, to undertake a detailed compliance check, the building effectively needs to be fully designed as the size and location of every living room, and private open space in the development needs to be known. In this instance, the analysis is verifying compliance as opposed to informing the design process. It is, therefore, advisable to run a preliminary compliance check to verify if the massing can comply, before undertaking detail spatial planning. This tutorial will demonstrate just the preliminary analysis method. Refer here for the detailed analysis (Part 2) method in Grasshopper or here for the Rhino.Inside Revit version.
Background
Before getting into the mechanics of the script, it is crucial to fully understand how the guide defines solar access and its calculation. The ADG states that:
Living rooms and private open spaces of at least 70% of apartments in a building receive a minimum of 2 hours direct sunlight between 9 am and 3 pm at mid winter in the Sydney Metropolitan Area and in the Newcastle and Wollongong local government areas.
(Objective 4A-1, p.79).
Solar access is defined as ‘the ability of a building to receive direct sunlight without the obstruction from other buildings or impediments, not including trees. Sunlight is direct beam radiation from the sun’ (p.78). Essentially what this is asking is, can the living room and private open space ‘see’ the sun for a minimum of 2hrs (or 3hr) between 9am and 3pm on 21 June.

Off-the-shelf software limitations
Most of the environmental analysis software available to architects doesn’t satisfy the ADG solar access requirement. For example, Autodesk’s Insight 360 uses the A360 rendering engine and is an illuminance based analysis. This means that it is looking for a minimum lux level to determine if the space is complying. This method is a daylight autonomy analysis and is quite different from what the ADG is asking. For example, how does one determine what the threshold lux level is to decide whether it complies? Is it 200 Lux, 300 Lux, or some other Lux value? Sefaira’s SEPP65 daylight compliance tool also works similarly.
To be true to the ADG, we need to calculate vectors to satisfy the ‘direct beam of radiation from the sun’. While it is possible to generate views from the sun, to verify if a direct beam is possible visually, it is not easy nor accurate to aggregating the results. A better method is to use vectors from the sun and evaluate the results mathematically. This is why it is best to adopt Grasshopper and Ladybug. Vectors are produced from the position of the sun, and a simple true/false value is returned representing if the sun is visible, that is, a direct beam of radiation from the sun is possible.
Workflow logic
When calculating the results, the ADG states that:
To maximise the benefit to residents of direct sunlight within living rooms and private open spaces, a minimum of 1m2 of direct sunlight, measured at 1m above floor level, is achieved for at least 15 minutes.
(p.78)
This requirement is a much more difficult task than one may think. Firstly, the ADG is requesting that when aggregating the results, only blocks of 15mins can be counted. Put another way, if an apartment achieves 14mins during early morning and 106mins in the late afternoon, even though it achieves 2hrs (120 mins) of total solar access, part of it was for less than 15mins which means we can’t count that portion and therefore the apartment doesn’t comply. This requirement does not necessarily mean that we need to test at 15mins intervals. Only that we must achieve a minimum of 15 consecutive minutes for it to be counted towards the total.
Sun vectors
Ladybug’s ‘sunPath’ component takes an analysis period and a time step to produce a series of vectors. If we are analysing from 9am to 3pm on 21 June, there is a maximum of 6hrs of solar access possible. Furthermore, if we have a time step of 4 per hr (equal to 15mins per analysis), the component would generate 24 vectors in total (6hrs * 4 vectors/hr). This list would correspond to rays of the sun at 9am, 9:15am, 9:30am, etc.
However, the problem is that the final vector is 2:45pm. The vectors represent a moment in time. Just because the sun is visible at 2:45pm doesn’t mean that it will still be visible at 3pm. We, therefore, need to add a vector to the end of the analysis period, 3pm, to make sure that the sun is there for the entire 15min period. Rather than having 24 vectors, we need 25 vectors. Of course, we could perform the analysis on a minute-by-minute basis, but this would equate to 6hrs * 60 vectors/hr + 1 final vector = 361 vectors. This expanded list would significantly increase the computational processing and most likely won’t affect compliance by any significant margin.
Minimum time step
In addition to the extra vector, we also need to ensure that the 15mins is continuous. If the sun is visible at 9am, but it isn’t there at 9:15am, 15mins has not been achieved. Therefore we cannot merely use Ladybug’s ‘sunlightHoursAnalysis’ result to determine total hour compliance as this aggregates the results. We need to use the ‘sunIsVisible’ output and filter out those ‘complying’ results which do not have a minimum of 2 consecutive vectors, representing 15min continuous minutes.
Minimum area
Once the correct vector calculations have been performed, the next step is to aggregate the results to ensure that the minimum area threshold of 1m2 is achieved. Each face of the resultant mesh needs to be evaluated and filtered into two lists: complying meshes and non-complying meshes. From the complying mesh, we need to perform a disjoint function to obtain each congruent mesh. For example, if we have two ‘patches’ of direct sun in one apartment, and one of those patches is less than 1m2, it cannot be counted towards the total compliance area.
Geometry preparation
To run the analysis, we first need to model the building and its context. Since we are only doing a preliminary analysis, the model can be simple massing with little or no articulation. The massing can be modelled in either Revit or Rhino.
Revit workflow
Select the massing to be exported and go File > export > CAD formats > *dwg. Hit the ellipsis under setup.
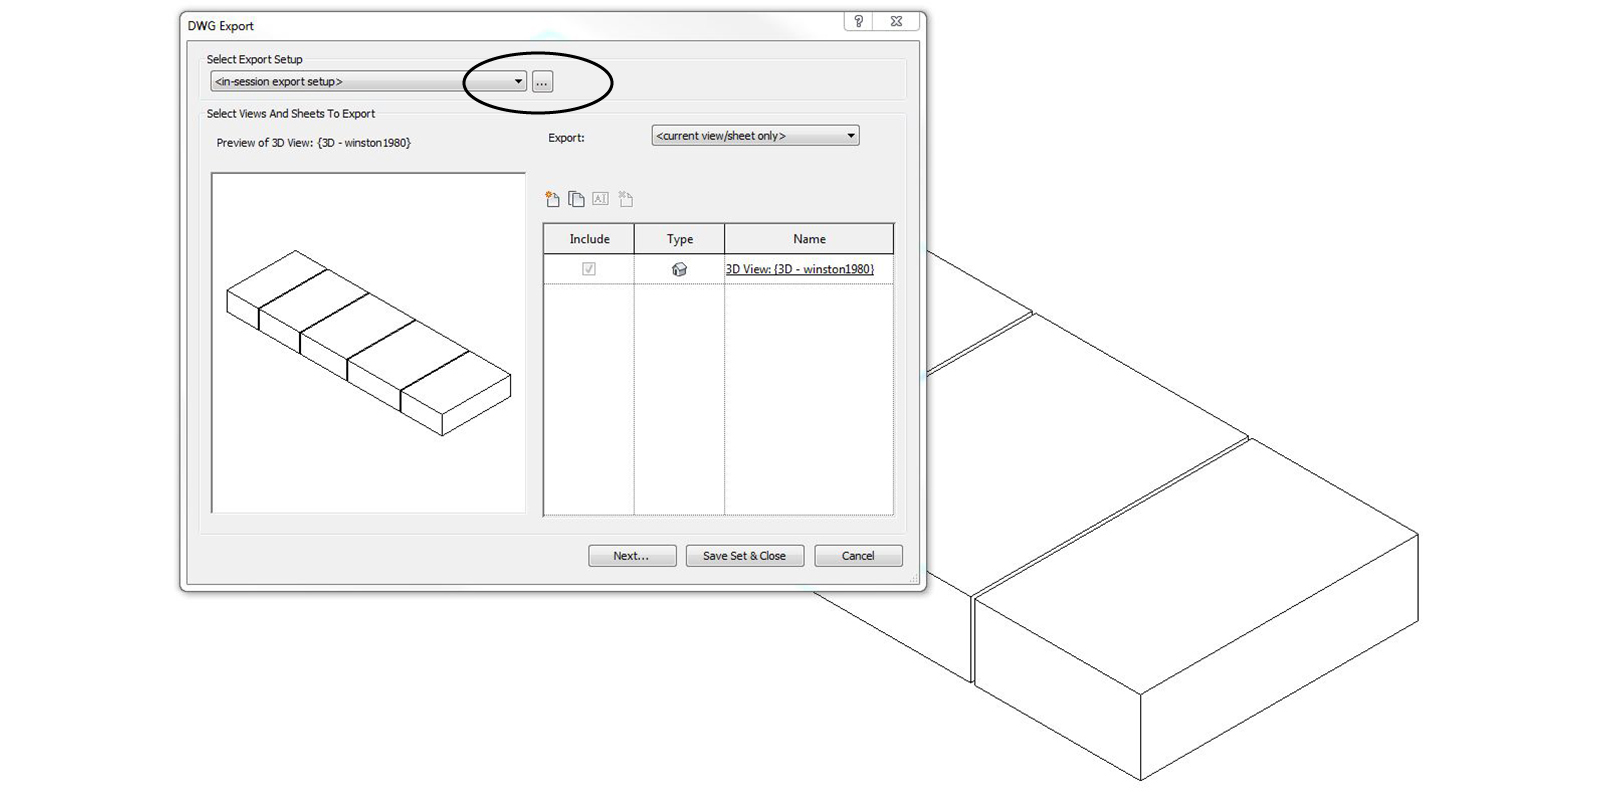
Under the solids tab, ensure it is set to ‘ACIS solids’. This setting will allow Rhino to import breps as opposed to a mesh.

Import *dwg file into Rhino. The objects will come in as blocks. Explode the blocks and merge all breps into a single layer.
Rhino workflow
If you have Rhino geometry, you can use either surfaces or breps. If the analysis geometries are surfaces, it will be processed as-is. It is your responsibility to ensure there are no co-planar surfaces or junk geometry, which will skew the compliance results. If the analysis geometries are breps, they will be joined into a solid union. The ‘roof’ and ‘floors’ of the massing will be removed. This process provides more accurate façade compliance calculations.
Orientation
The buildings do not need to be geo-referenced; however, it does need to be orientated correctly relative to North. You should check with the planning authority which North is to be used for the SEPP65 calculations. This is critical as there are several ‘Norths’ including True North, Magnetic North, and the Map Grid of Australia 1994 (MGA94). Generally, True North should be used if the development is in the City of Sydney.
Grasshopper Script
The Grasshopper script is broken into three main sections: On the left are the input parameters; In the middle is a cluster which is doing all the heavy lifting; and finally, on the right, we have the outputs broken down into geometry, metrics, graphics and additional info. The following requires the Elefront, Ladybug and GH Python plug-ins to be installed to work correctly.
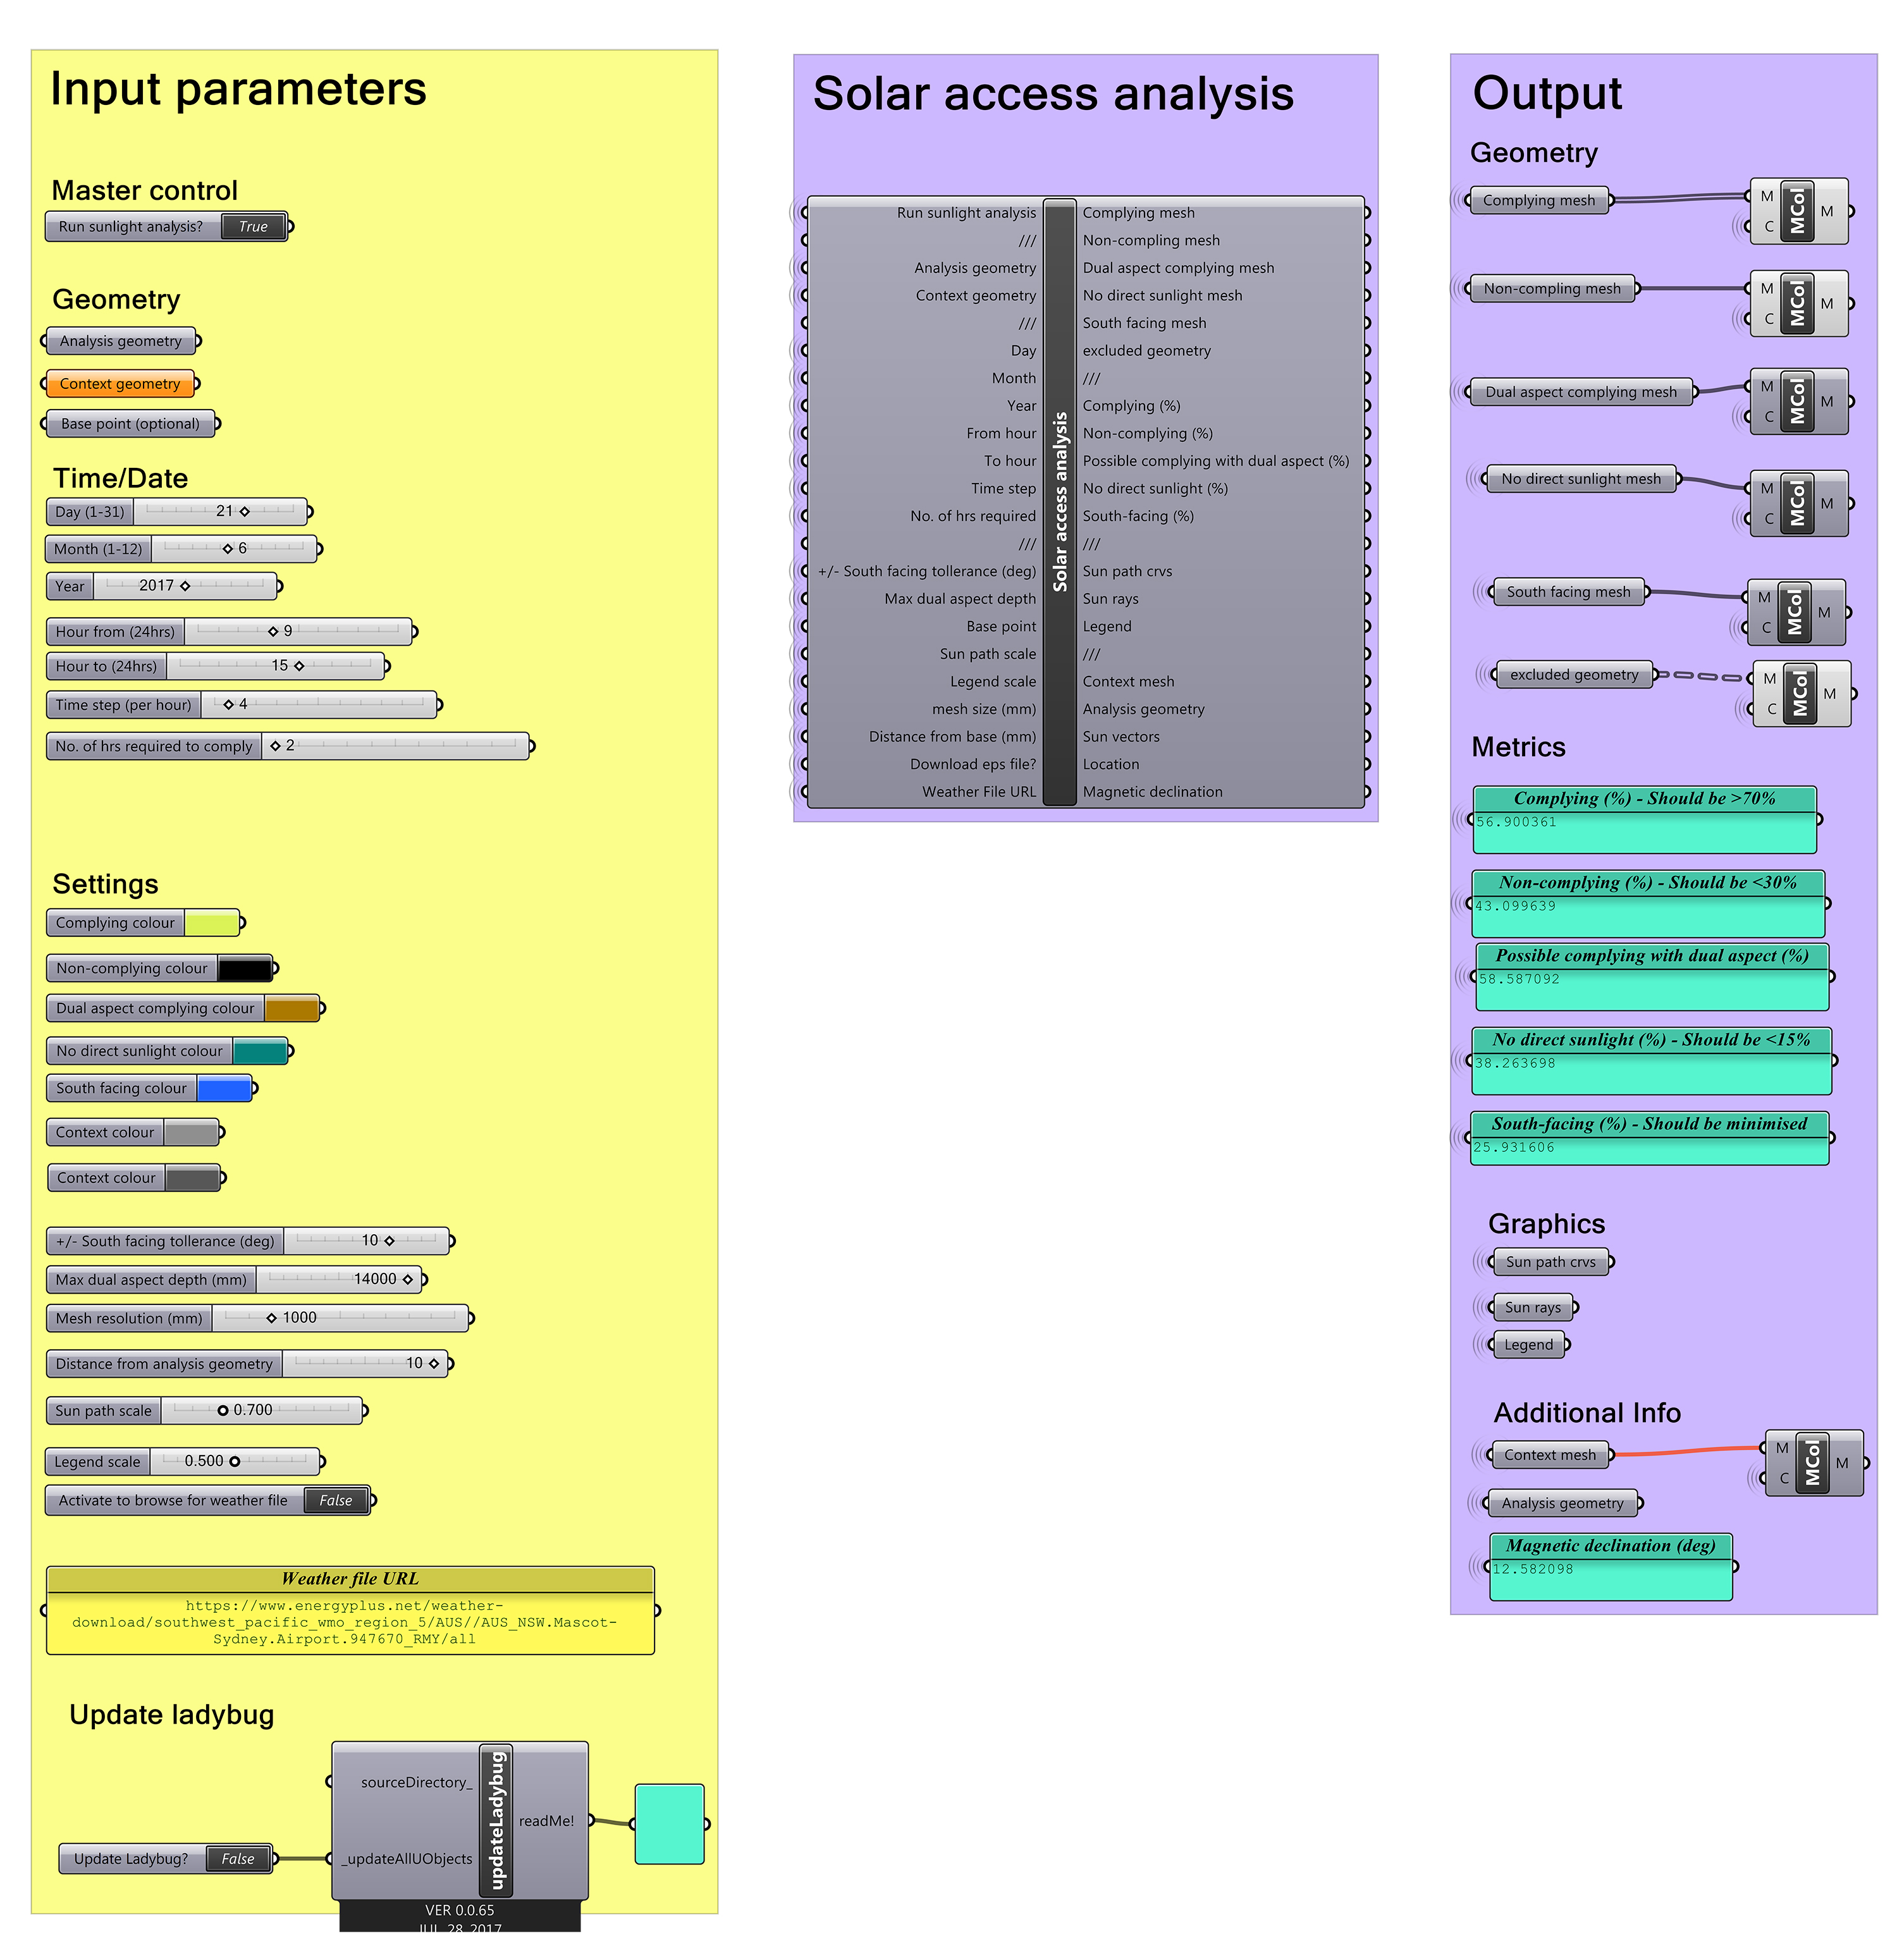
Right-click on the ‘Analysis geometry’ input and select ‘Set Multiple Geometries’. Next, chose the geometry to reference in the Rhino viewport. Repeat for the ‘Context geometry’ input. Ensure all the settings are correct.
Weather data
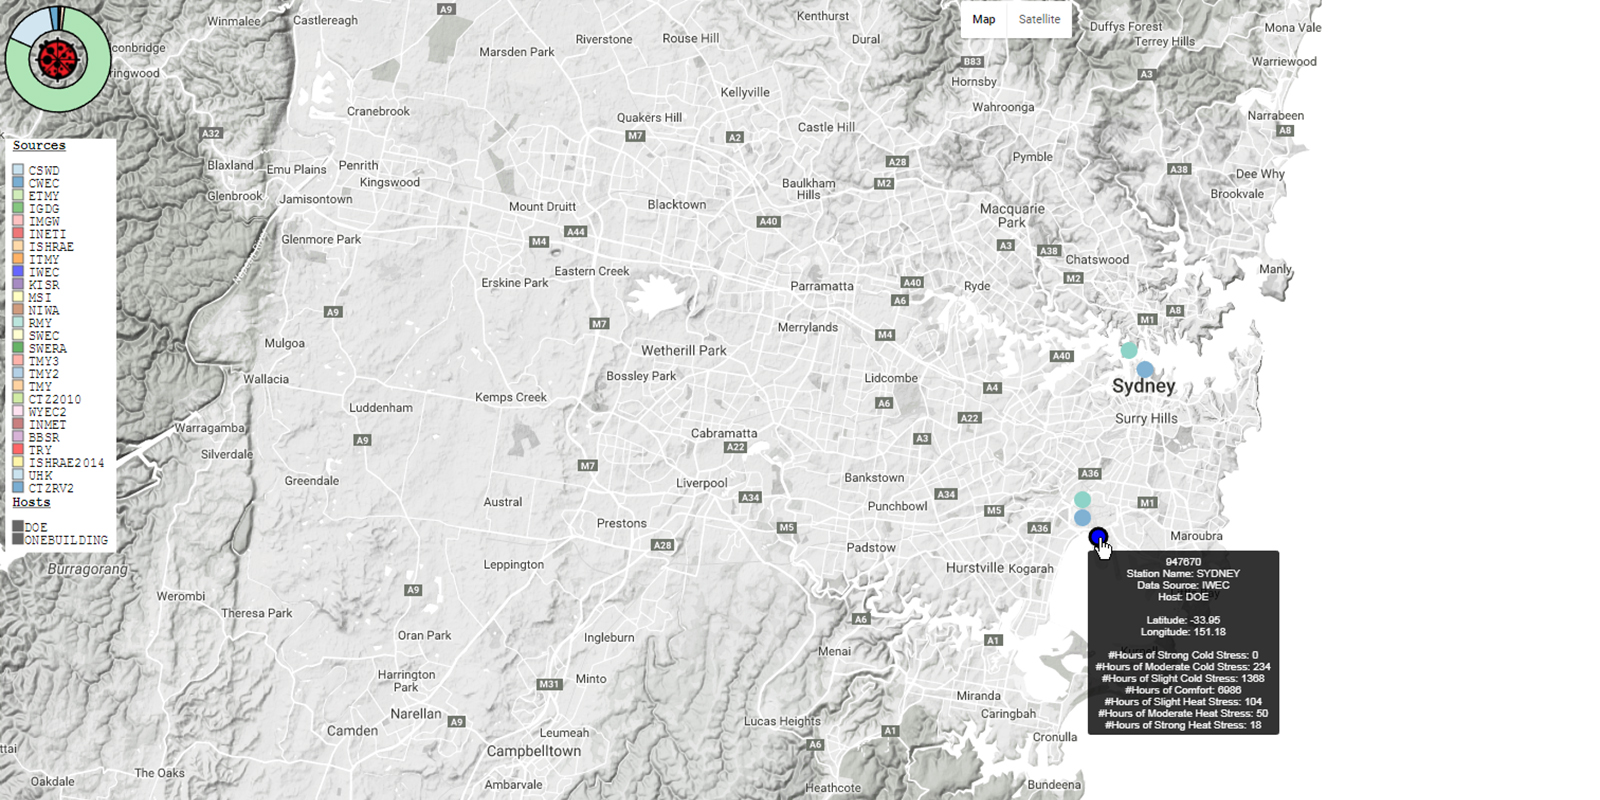
The script reads an *epw weather file for a specific location. In the example above, it is using weather station #947670, which is at the airport in Sydney, Australia. The weather files can be downloaded from the EnergyPlus website which is funded by the US Department of Energy. However, the script is configured to take you to Ladybug’s epw map where you can copy the URL of your desired location and paste it into the Grasshopper script.

Results
The analysis geometry will be converted into a mesh. The mesh resolution input becomes critical in this process. If the resolution is set too large, the results will be too coarse to be meaningful. If the mesh resolution is set too small, the script will take a very long time to process. It is recommended to set the mesh resolution to 500mm or 1000mm. Before any results are visible, you’ll need to activate the master Boolean control. Once run, the various output will be created.
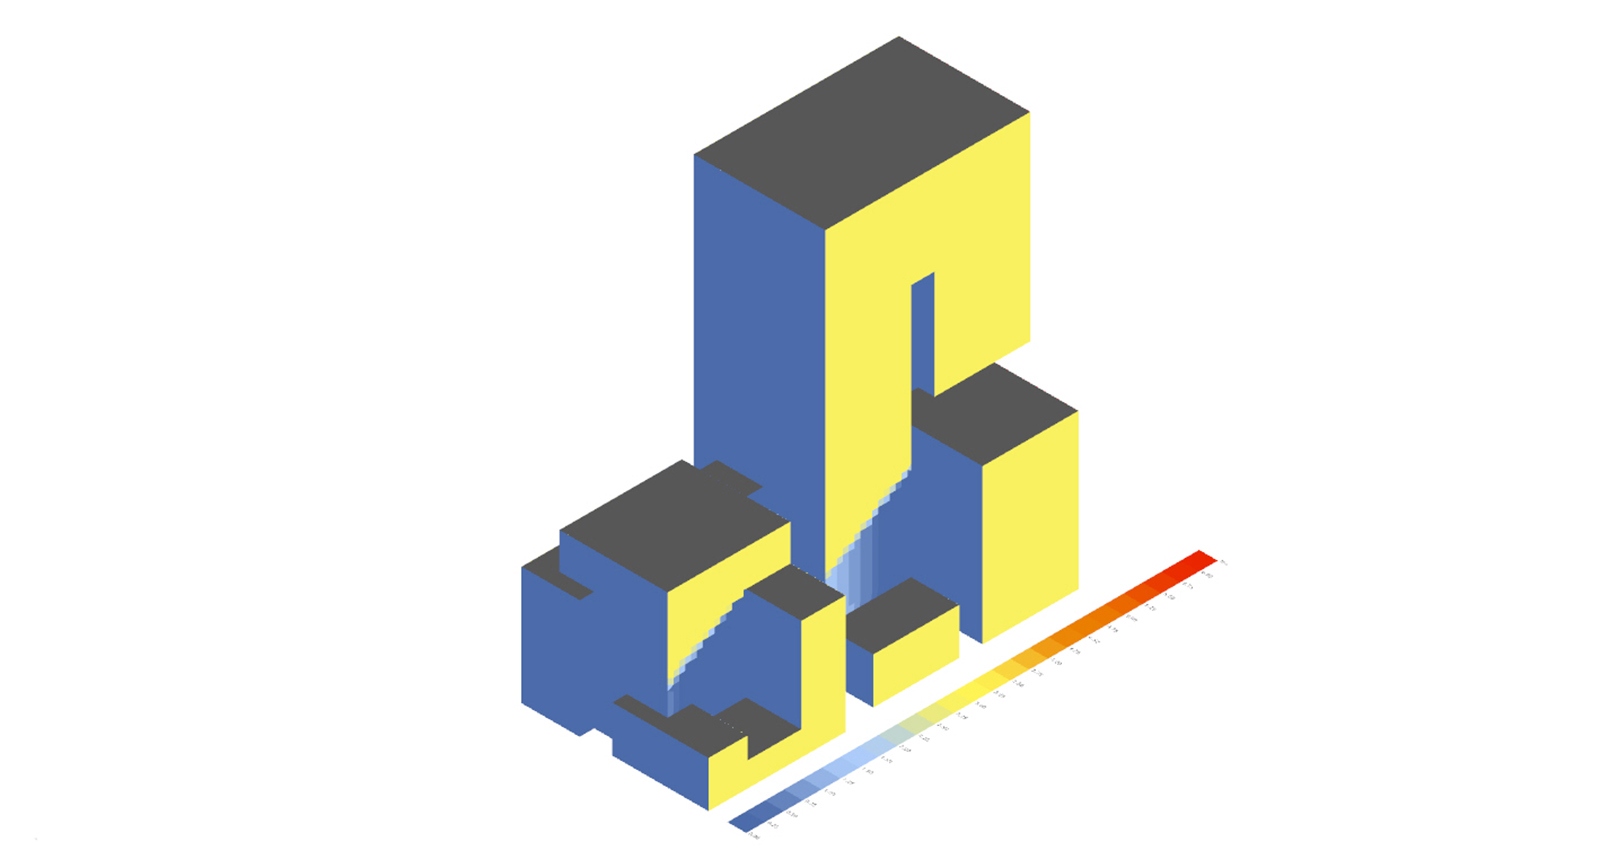
In addition to achieving 2hrs of direct sun, there is a requirement to minimise apartments which receive no direct sun. The ADG states, ‘A maximum of 15% of apartments in a building receive no direct sunlight between 9 am and 3 pm at mid winter’. As such the script gives the option to visualise surfaces which receive no direct sun. This output is not necessarily exclusively south-facing facades, but any area which receives no direct sun. For example, lower levels which are heavily overshadowed.


