

Rhino.Inside Revit is an open-source project allowing Rhino and Grasshopper to run inside Autodesk Revit. Somewhat counter-intuitively, Rhino.Inside Revit outperforms Dynamo in many ways. This tutorial explores some of those differences and demonstrates how Dynamo users can undertake similar tasks using Rhino.Inside Revit and the benefits of doing so.
Background
Several years ago, I published the Dynamo for Grasshopper users guide with the premise of assisting Grasshopper users in learning Dynamo. Since then, Dynamo awareness and knowledge have come along in leaps and bounds from the wealth of material that users have shared. However, with the release of Rhino.Inside Revit, we’ve come full circle, with Dynamo users now learning Grasshopper.
As one would expect with any early adoption, it can be a steep learning curve. And this is indeed what I found, even as an advanced Grasshopper and Dynamo user. With different logic to Dynamo, incomplete documentation, and constant changes from active product development, it has certainly made things difficult.
Earlier this year, at the BILT ANZ conference, I decided to capture some of this learning to benefit others. Titled ‘Rhino.Inside: Connecting Grasshopper to Revit’, the presentation showcased how to learn Rhino.Inside Revit from the perspective of a Dynamo user. You can watch the recording here if you have a Digital Built Environment Institute (DBEI) membership. However, for the vast majority who couldn’t attend, I’ve included much of the material below to assist you on your Rhino.Inside Revit journey.
Getting started
If you haven’t already done so, refer to our Rhino.Inside Revit tutorial to get you up and running. It covers installation, launching and unit settings. This tutorial assumes you already have a basic understanding of how to setup Rhino.Inside Revit.
Like most of the interoperability plug-ins that came before it, Rhino.Inside Revit works in a similar way. Once a Grasshopper script is developed, generally only minor modifications are needed. Firstly in the front to accept Revit inputs, and lastly, at the end, for elements to be created in Revit. This logic means that a large chunk of the script can be developed outside of Rhino.Inside Revit, speeding up the development process. However, saying that, there are a few key principles that differ from other solutions.

Key Principles
When migrating from Dynamo to Rhino.Inside Revit, several significant differences may trip up would be users. The first is navigating the User Interface (UI), as the terminology and logic are somewhat different. The second is the concept of pass-through components, which don’t exist in Dynamo. The third relates to element tracking as Rhino.Inside Revit has more advanced functionality than what Dynamo users will be familiar with. And finally, the User Experience (UX), which can be challenging even for experienced Grasshopper users.
Principle #1 – Revit-aware components
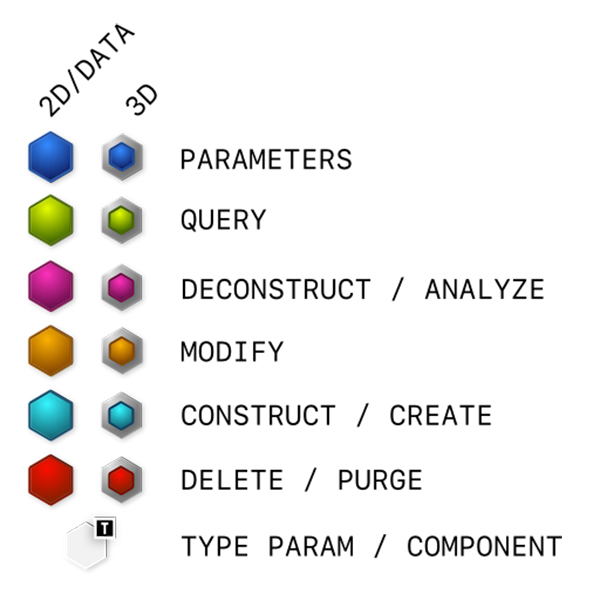
In Dynamo, nodes in the Library are organised hierarchically within libraries, categories, and, where appropriate, sub-categories based on whether the nodes Create data, execute an Action, or Query data. In Rhino.Inside Revit, however, components are grouped not by the type of element they create (for example, ‘Dimension’) but rather through more generic nomenclature (for example, ‘Annotations’).
Additionally, the Revit-aware component icons help identify the action that the component performs. As shown below, the base colour shows the type of action (Query, Analyse, Modify, Create). A series of badges are applied to icons that show Type, Identity, or other aspects of the data that the component is designed to work with.
Principle #2 – Pass-through components
In some cases, a particular pass-through component has been used to combine the Analyze, Modify, and Create actions into one component. This functionality helps reduce the number of components and avoid cluttering the interface. These components have a split background.

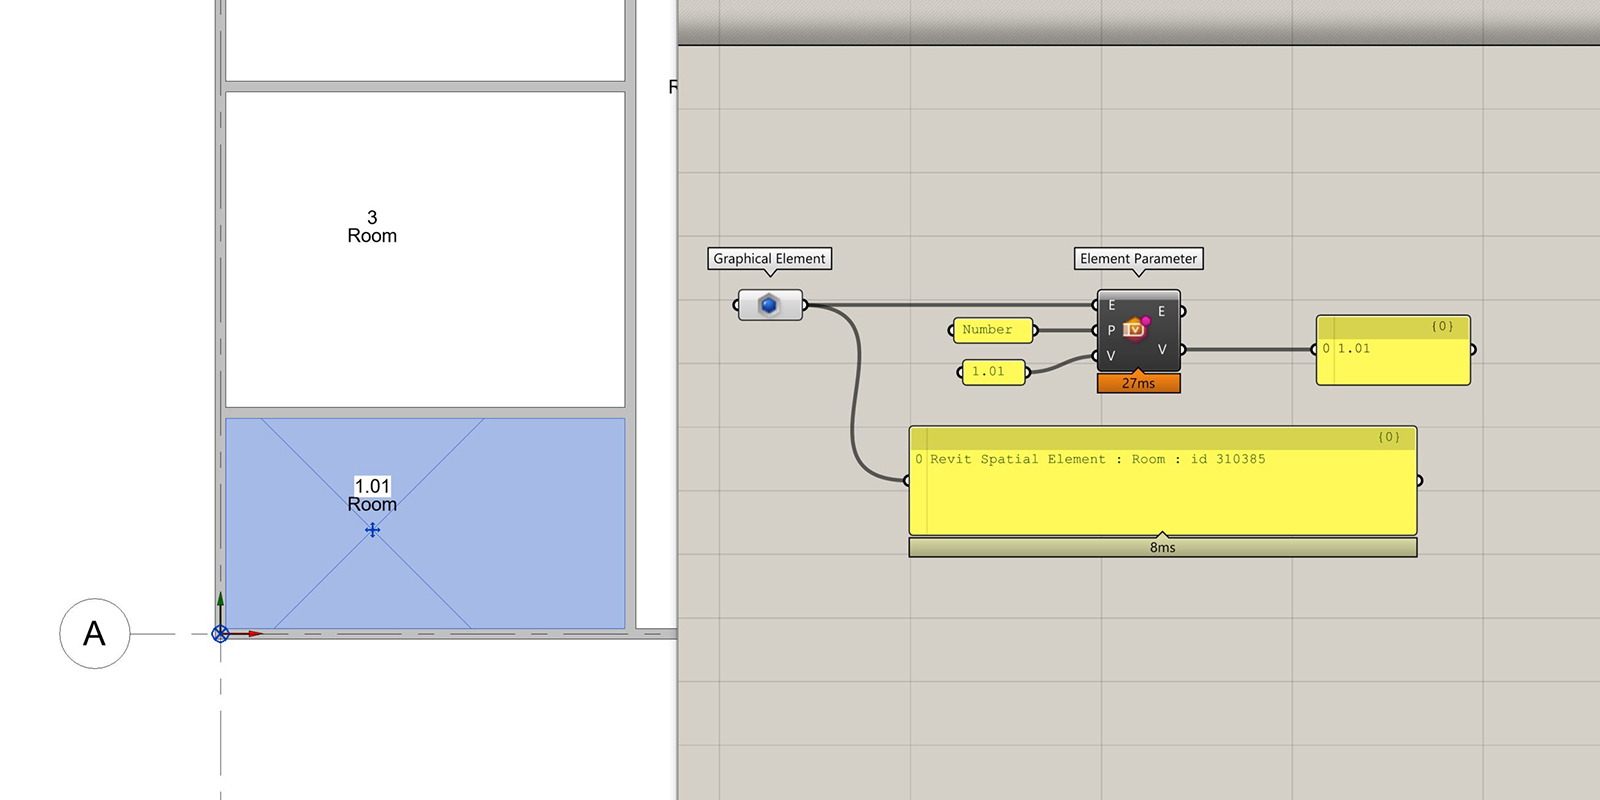
Take for example the ‘Element Parameter‘ (Revit > Element > Element Parameter) component. The first input parameter is the Revit element that this component deals with; in this case, we’re using a room. Next is the parameter to query/modify. If the value input is empty, the component will query the element’s parameter, in this case, returning a room number of ‘4’.
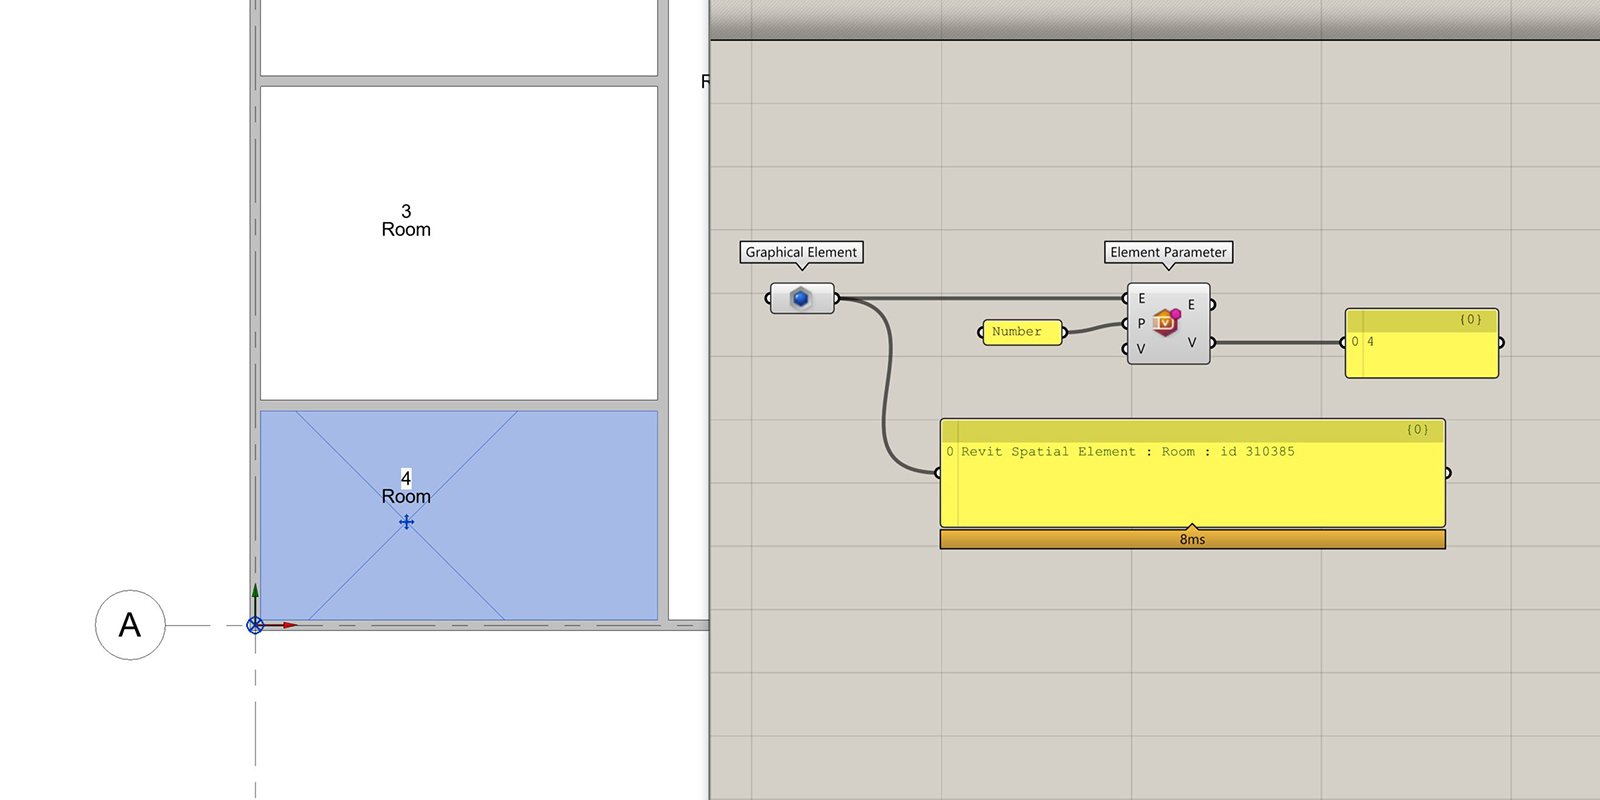
However, if a value is entered as an input, the element’s parameter will be modified. Note that the component has changed to a dark background. This change indicates that a transaction has been performed.
Principle #3 – Element tracking
Some Revit-aware components need to run Transactions on the active document to create new elements or make changes. These components show a dark background when they execute a transaction. Associated with transactions is element tracking. Element tracking allows Grasshopper to replace the Revit elements that it previously created. Each component output remembers which Revit elements it added and avoids creating duplicates. Only Add components in Grasshopper use tracking. Grasshopper will remember these elements after the file is closed and re-opened in the future.
The Tracking Mode can be controlled by right-clicking on the component centre. There are three modes:
- Disabled – This turns off any tracking of created Revit elements. This setting can result in duplicate elements being created in Revit.
- Enabled : Replace – This will create entirely new elements in Revit, replacing the previously-created element each time Grasshopper runs.
- Enabled : Update (default) – Grasshopper will try to modify existing elements in Revit if possible (if the Revit API allows the type of modification). Otherwise, new objects will be created, and the component would behave like ‘Enabled : Replace’.
Each output on an Add Component has additional controls to help manage element tracking:
- Highlight – Select and highlight the Revit elements created by this output.
- Unpin – Remove the Pin from any Revit element created by this output. There is also an Unpin component that can be used for this.
- Delete – Delete any elements tracked by this output.
- Release – The output will forget the objects and not continue to track them. Be aware that this might create duplicate objects if the Grasshopper definition is re-run.
Principle #4 – User Experience
Zoomable user interface
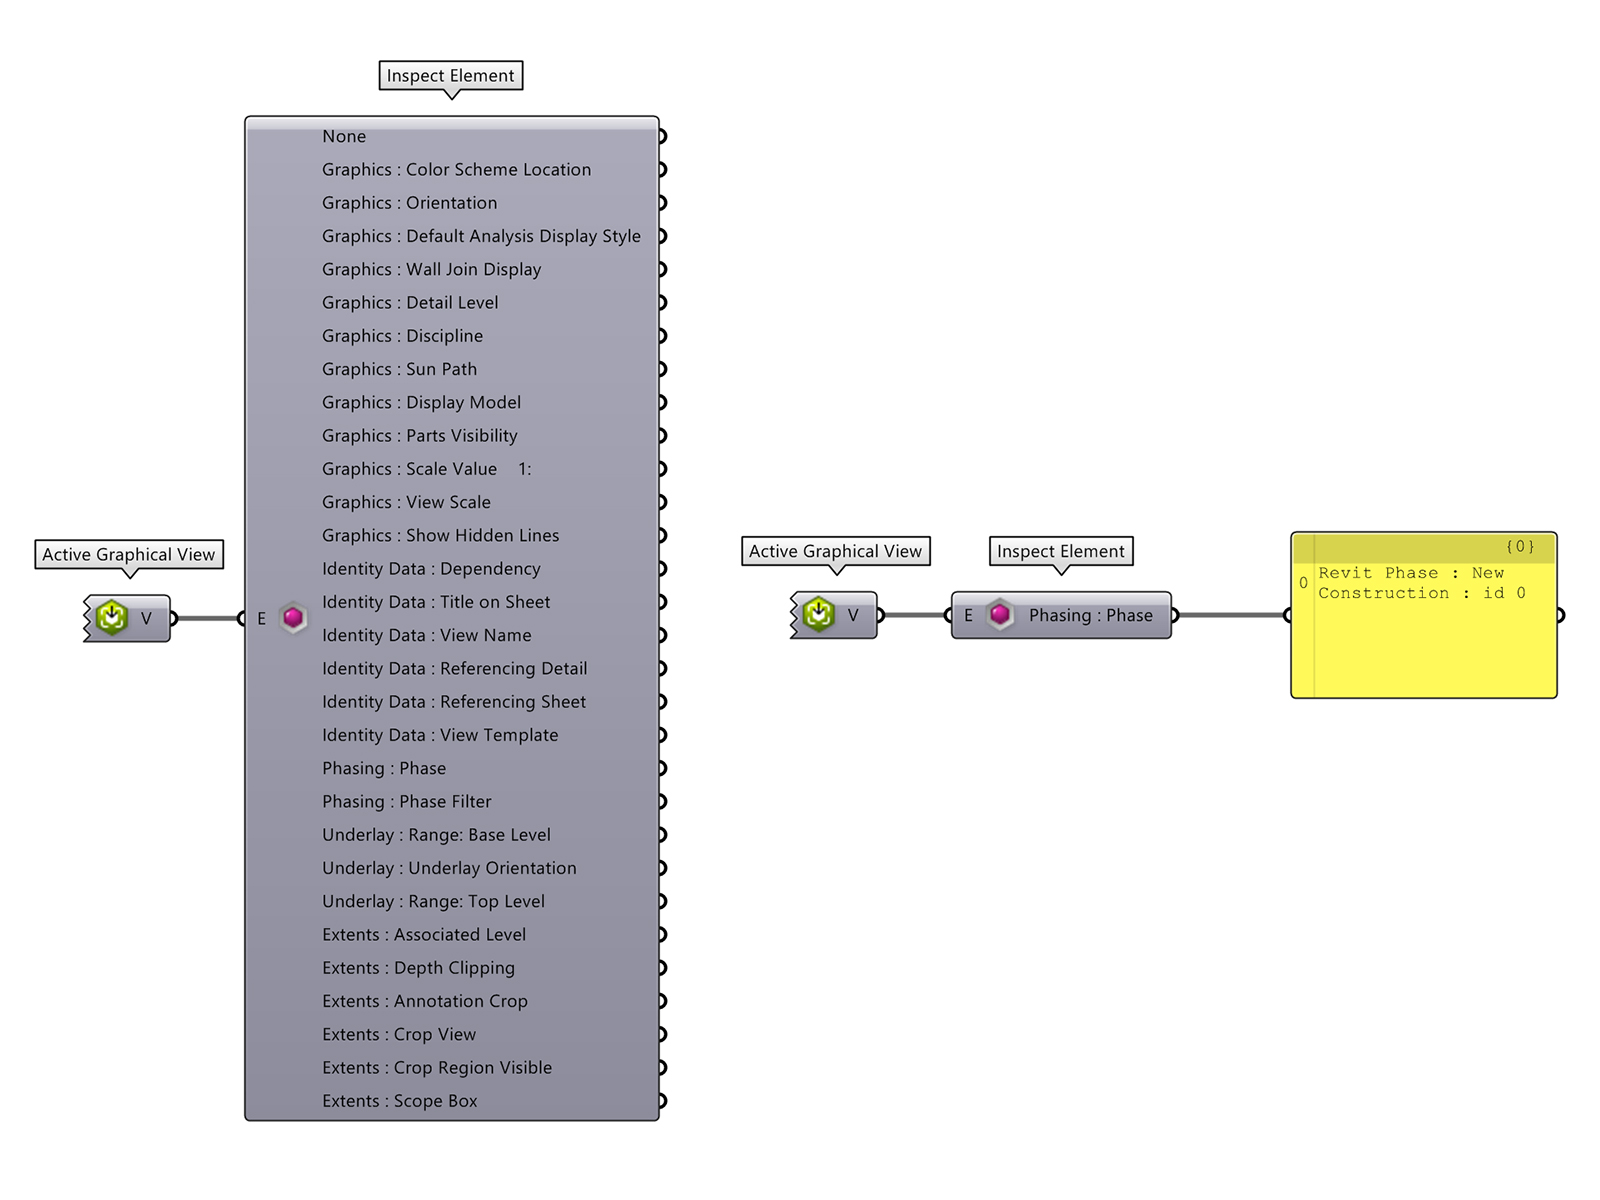
Grasshopper components have the ability to add or remove inputs and outputs via zooming into the component and enabling the plus or minus icon. While this functionality reduces visual clutter, it can confuse users not accustomed to it. Take, for example, the ‘Inspect Element’ component. The default state is to show no outputs whatsoever.
Right-clicking on the component is needed to show all of the outputs. Once an output is wired to a component downstream, you can then right-click on the Inspect Element component and select hide all not connected. This will take it back to the compact state with only the outputs used shown.
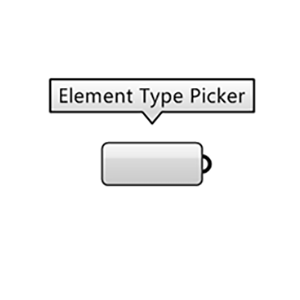
Element Type Picker
Now consider the ‘Element Type Picker‘ (Revit > Input > Element Type Picker) component. This component has no input and output when first placed on the canvas, offering an abysmal user experience. However, the component is populated with the various element types once connected.
Categories Picker
Finally, consider the ‘Built-in Categories Picker’ (Revit > Category > Built-in categories) component. (Note that in more recent versions, this component has been moved to the Object Styles tab.) The list is pre-populated with all possible categories, which results in approximately 1000 items.
Browsing for the exact category you need is impossible as there simply isn’t enough accuracy in the vertical scroller. This means users are forced to search for the category. It is here that Rhino.Inside Revit shares some commonality with Dynamo: the search functionality is far from great. For example, searching for ‘Floor’ instead of ‘Floors’ means that the category that you actually want (Floors) will be well down the list of results. Therefore, users need to know precisely what they are searching for, which sort of defeats the purpose of using search.
Example #1: Referencing rooms elements via filters
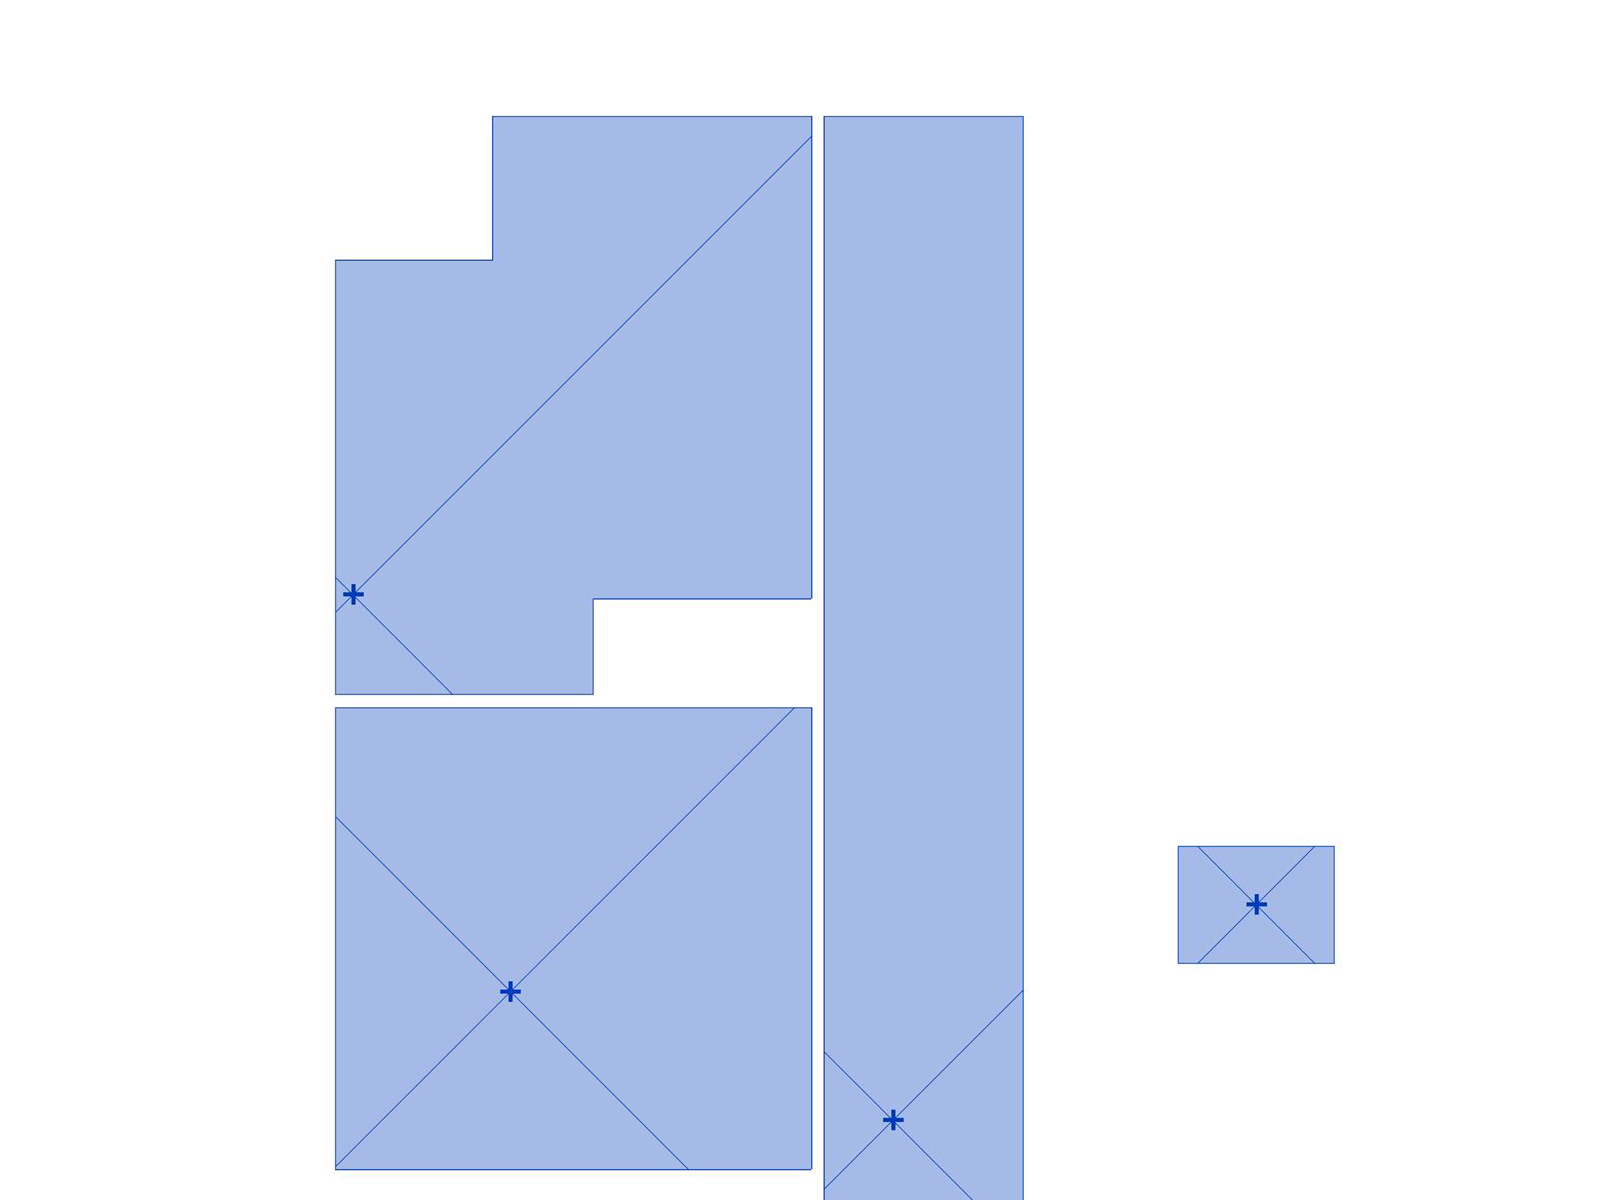
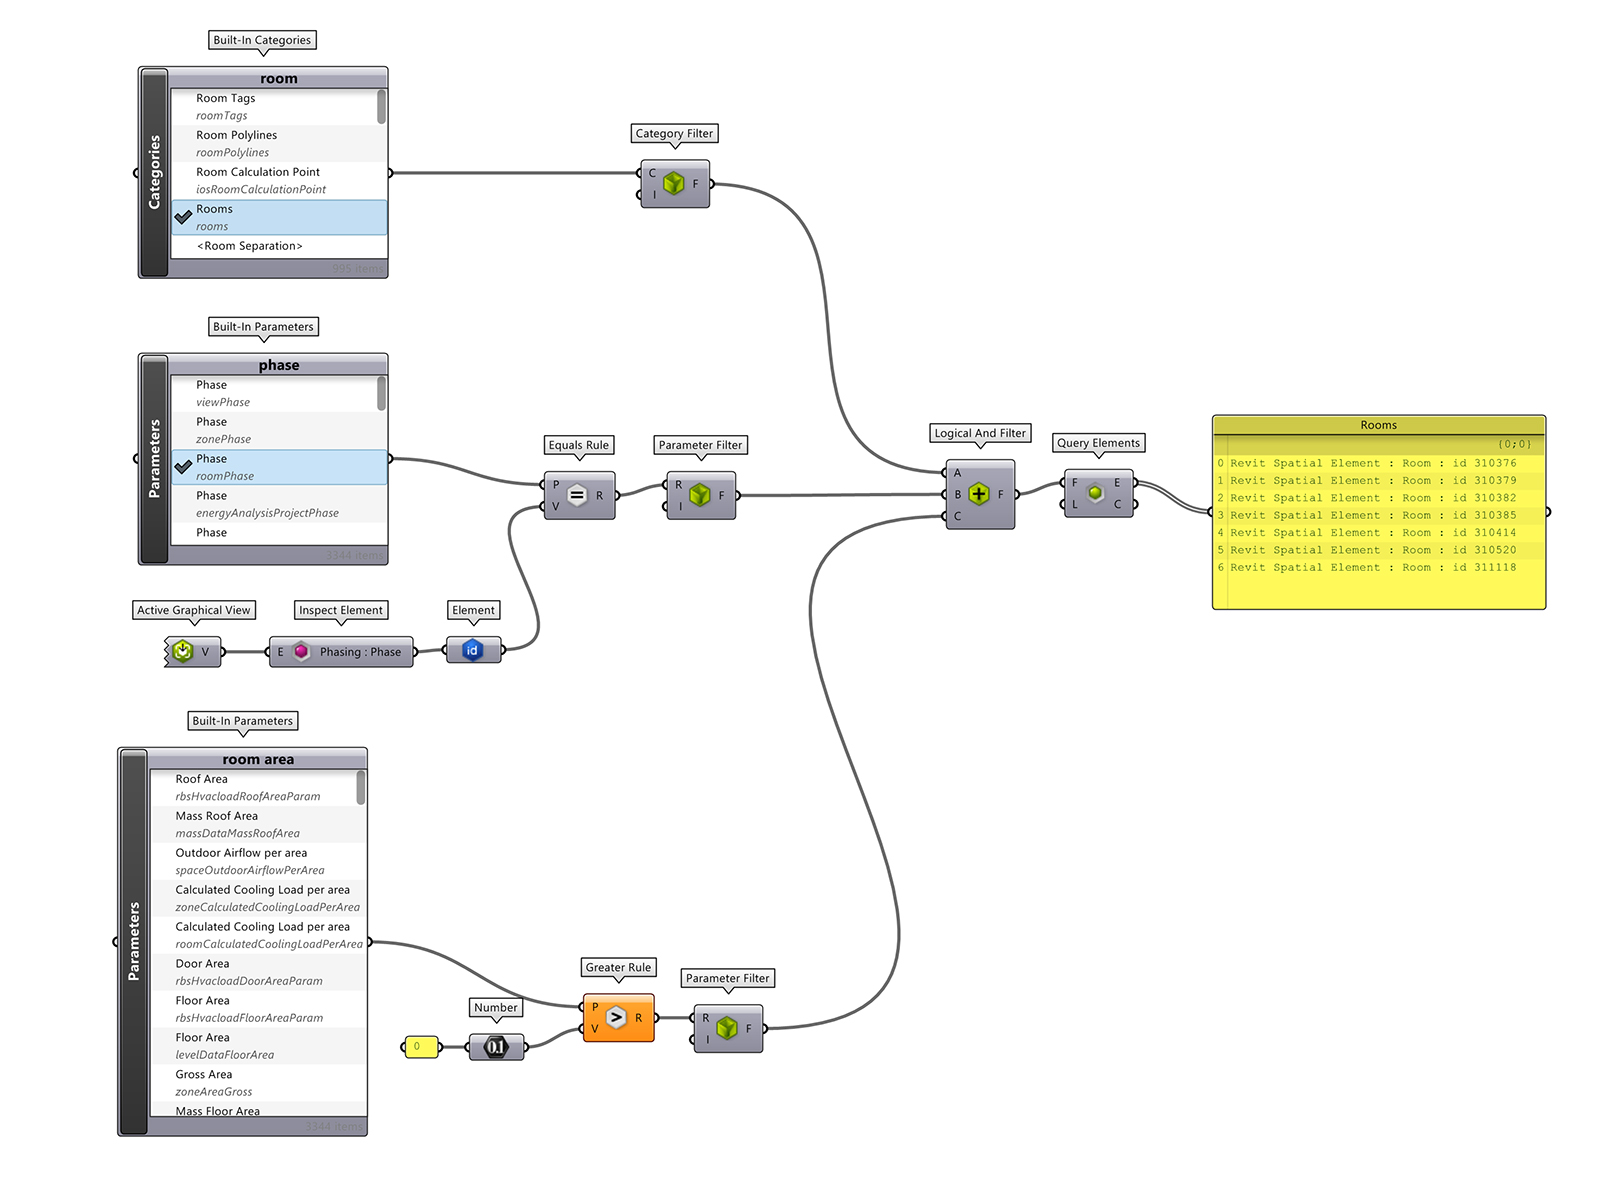
One of the valuable features of Rhino.Inside Revit is the use of filters. Take, for example, collecting all rooms within a project. In Dynamo, users will be accustomed to collecting all elements by category (Rooms) and then applying a series of conditional statements (such as room area is greater than 0) and progressively filtering out elements.

However, in Rhino.Inside Revit, we can create a series of filters and combine them into a Logical AND filter, which is a much more efficient way of collecting elements. In the example below, there is one filter for category (Rooms), another for phase (based on active view), and finally, area (for placed rooms only).
Example #2: Creating floor finishes by rooms

One of the frequently used Dynamo graphs is creating floor finishes automatically using a room’s boundary. This process generally looks something like this:

Note that in Revit 2022, an API change now allows floors to be created with multiple boundaries, such as internal islands created by shafts or columns. However, no OOTB Dynamo node enables this functionality (yet). To take advantage of this functionality, Python would need to be used. Similarly, Rhino.Inside Revit currently only supports single floor boundaries.

To replicate the floor finishes process in Rhino.Inside Revit, the script looks something like the above. In this example, I’m manually getting the room boundary. However, there is a user component called ‘Analyse Spatial Element‘, which can be used instead.
So what would be the advantage of using Rhino.Inside Revit over a more straightforward Dynamo graph? Quite simply, element binding in Dynamo for sketch-based elements, such as floors, re-creates elements rather than updating the sketch. As such, re-running a Dynamo graph after the Revit model has been modified will cause tags and dimensions to drop off.
Rhino.Inside Revit, on the other hand, can update the sketch-based elements, saving significant time re-tagging elements.
Additionally, many BIM managers have deployed Dynamo Player graphs to the rest of their organisation. Dynamo Player does not save any element binding, as the Dynamo file is essentially opened, run and then closed without saving. Rhino.Inside Revit’s Player, however, does save element binding, meaning that particularly for this example, Rhino.Inside Revit would be a better option.
Example #3: Referencing linked geometry
One of the drawbacks of Dynamo is that much core functionality is missing from the OOTB nodes and users need to rely extensively on third-party packages. Take, for example, getting the geometry of a linked model. In Dynamo, users would typically use the Archi-lab or Genius Loci package to achieve this.
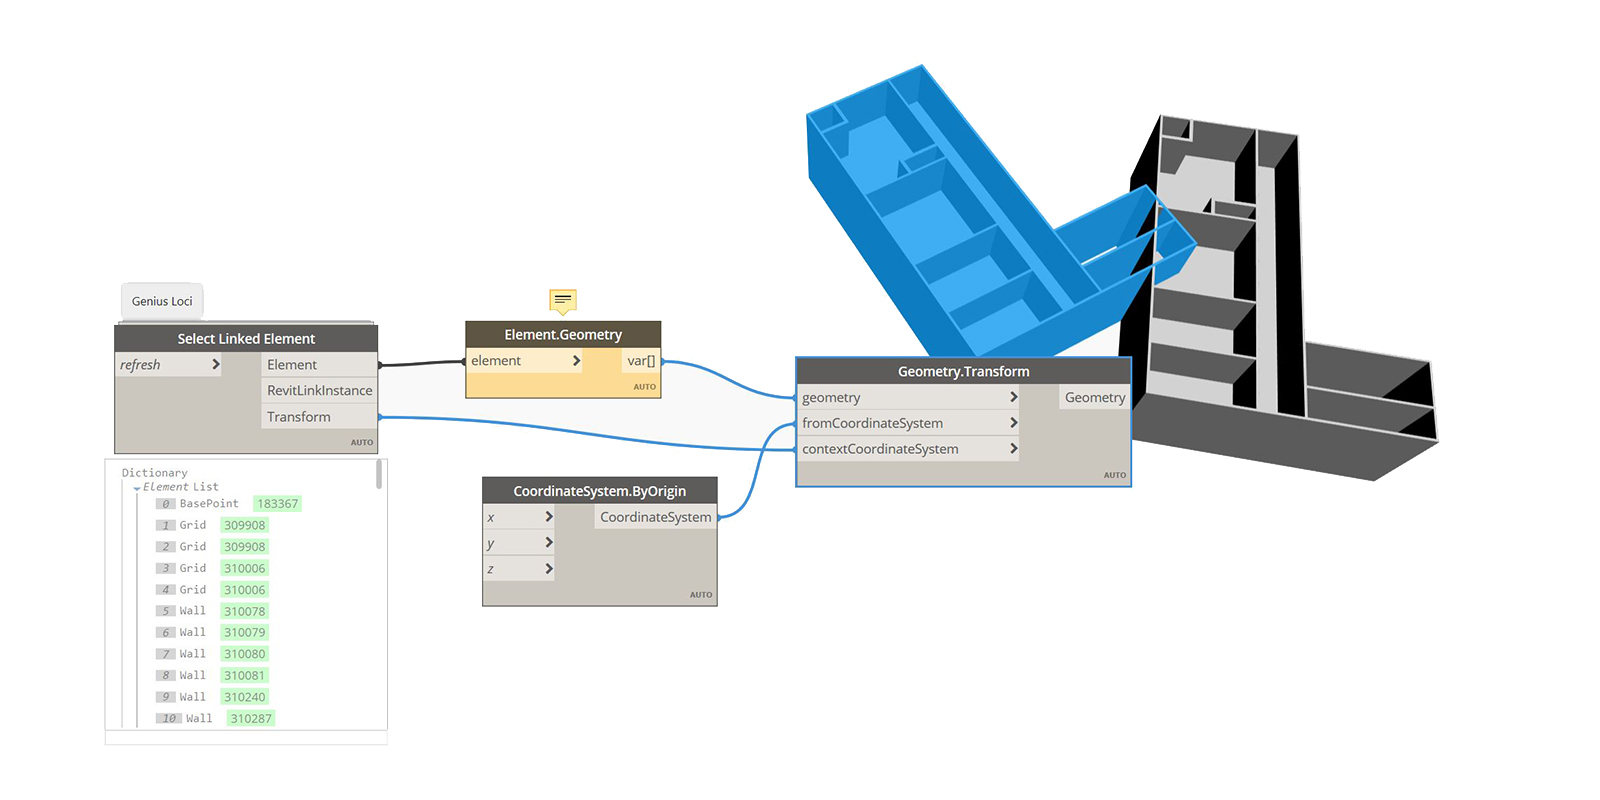
In Rhino.Inside Revit, the workflow is similar, however, it can be achieved with OOTB nodes. Note that it is still necessary to transform the linked model’s geometry to the current document’s coordinate system.

Limitations
One of the current limitations of Rhino.Inside Revit is a lack of functionality related to 2D drafting. While it is possible to create views and sheets, McNeel has focused its efforts on the 3D element creation functionality. As such, Dynamo users looking for text notes, filled regions, dimensions, revisions, and warning functionality may be disappointed.

As of version 1.8.8 in the daily build, McNeel has added new components, including Add (filled) Region, Add Text, and Add Detail Line. No doubt, more 2D-based components will be released soon.
Dynamo or Rhino.Inside Revit?
Many readers may ask, “Which software should I use – Dynamo or Rhino.Inside Revit?” As shown above, Rhino.Inside Revit is generally more competent and more efficient in its logic and application. From eliminating dependencies on third-party plug-ins to better ways to create and modify elements, Rhino.Inside Revit is fantastic. This is somewhat surprising given that Autodesk develops both Revit and Dynamo and, therefore, should have the advantage.
On the other hand, Rhino.Inside Revit is still in development and quite a lot is still in flux. The logic of selecting elements has undergone significant change, and the documentation hasn’t kept up. This oversight makes it difficult for new users to get started. Additionally, Dynamo still has some functionality that hasn’t yet made its way into Rhino.Inside Revit.
But in many ways, asking which is the better software is the wrong question. At Parametric Monkey, we believe in using the best tool for the job. Sometimes that is going to be Dynamo, and other times, it is going to be Rhino.Inside Revit. But it doesn’t have to be an either/or scenario. The video below demonstrates how Dynamo and Rhino.Inside Revit can be run simultaneously on the same model. While I wouldn’t recommend doing this on a live project, it highlights how the two software can co-exist.
Conclusion
Somewhat counter-intuitively, Rhino.Inside Revit outperforms Dynamo in many ways. While it is still in active development and lacks some Dynamo functionality, organisations would be well advised to look into how Rhino.Inside Revit can complement their existing Dynamo workflows. It need not be an either/or scenario. The two can co-exist. So as always, use the best tool for the job and do better things.


